玩转 Material
约 2309 个字 • 1234 行代码 预计阅读时间 28 分钟
看似最简单实则最折磨的一步(╯﹏╰)
其实官方文档能解决 80% 的问题,但第一次 face 可能会迷失方向
所以我会先尝试为“设置”模块—— mkdocs.yml 写一份尽可能详细的说明书
让您能够游刃有余的在官方文档中找到自己所需
当然,我也会给出自己的配置方案,您可以在我的基础上修改(不建议)
关于 mkdocs.yml ,我们能做些什么?
字段树
mkdocs.yml
├─ site_author
├─ site_name
├─ site_url
├─ site_description
├─ repo_name
├─ repo_url
├─ copyright
├─ nav
│  └─ 您的项目结构
├─ theme
│  ├─ 主题配置
│  └─ features
├─ plugins
├─ markdown_extensions
├─ extra
├─ extra_javascript
└─ extra_css
字段解释
站点信息
- site_author:站点作者
- site_name:站名
- site_url:站点地址,如
https://dixilog.github.io/ - site_description:站点描述,用于搜索引擎附栏 / 收藏介绍
- repo_name:您的 github 仓库名称
- repo_url:您的 github 地址
- copyright:版权声明,不是很懂,建议百度
nav——导航树
mkdocs 初始化时会自主渲染 nav 下每一路径的文档
关于 nav
除了配置 blog 插件对应文件夹下文档,其余都需要先在导航树中说明,方可成功渲染
配置格式为“栏目 + 子文档”
下面以我的 nav 为例进行说明
- 一级缩进为总栏目,如“Home”“NBU-NOTEBOOK”等,栏目下可有任意子栏目
- 在 nav 中的顺序即为网址排序
- 每一栏目下必须有一个 index.md,而第一栏目下的为网站先导页,即 HOME 页
- 渲染后的 栏目名 受 nav 配置控制,文档名 一般就是标题
# 导航树配置
nav:
  - Home:
    - index.md
    - Build Your Own Blog:
      - build_your_web/index.md
      - build_your_web/access your github.io.md
      - build_your_web/玩转 Material.md
      - build_your_web/feishu2githubPages.md
    - build_your_web/markdown 速记.md
  - NBU-NOTEBOOK:
      - NBU-NOTEBOOK/index.md
      - NBU-NOTEBOOK/S&S.md
  - 随手记[TODO]:
      - 随手记/index.md
  - Chronic Study[TODO]:
      - Chronic Study/index.md
  - NBU_ROCOS:
      - ROCOS/index.md
      - ROCOS/info&ref.md
  - 闲言碎语:
      - blog/index.md
对应的目录树(部分)
docs
├─ index.md
│
├─ build_your_web
│  ├─ access your github.io.md
│  ├─ feishu2githubPages.md
│  ├─ index.md
│  ├─ markdown 速记.md
│  └─ 玩转 Material.md
│
├─ NBU-NOTEBOOK
│  ├─ index.md
│  └─ S&S.md
│
├─ 随手记
│  └─ index.md
│
├─ Chronic Study
│  └─ index.md
│
├─ ROCOS
│  ├─ index.md
│  └─ info&ref.md
│
└─ blog
   ├─ .authors.yml
   ├─ index.md
   └─ posts
熟悉之后就可以在自己构思的网站框架基础上搭建目录环境并配置 nav 啦~
我们还能做些什么?
这一部分和 Setup 部分对应
name:主题名称,这里填 material(当然,您也可以换成您喜欢的)
favicon:网站图标
language:语言
font:字体,包括正文与代码
palette:亮暗色模式配置
icon:用到的 icon,如 logo、注释等(1)
- icon 检索传送门
可选 icon
| Icon name |
Purpose |
|---|---|
logo |
左上角的 LOGO |
menu |
Open drawer |
alternate |
Change language |
search |
Search icon |
share |
Share search |
close |
Reset search, dismissannouncements |
top |
Back-to-top button |
edit |
Edit current page |
view |
View page source |
repo |
Repository icon |
previous |
Previous page in footer, hide search on mobile |
next |
Next page in footer |
我的配置
name: material # 主题名称
# custom_dir: overrides # 自定义文件夹,对于个别页面,如果您不想使用主题的默认样式,可以在这里进行修改,使用里面的文件覆盖主题的默认文件。具体可以参考material官方文档
favicon: img/favicon.ico  # 网站图标
language: zh # 语言
font: # 字体,大概率不需要换
    text: Roboto
    code: Roboto Mono
palette:
- media: "(prefers-color-scheme: light)" # 浅色
    scheme: default
    primary: light green
    accent: orange
    toggle:
    icon: material/lightbulb-variant
    name: Switch to dark mode
- media: "(prefers-color-scheme: dark)" # 深色
    scheme: slate
    primary: blue grey
    accent: amber
    toggle:
    icon: material/lightbulb-variant-outline
    name: Switch to light mode
icon: # 一些用到的icon
    logo: logo
    previous: fontawesome/solid/angle-left
    next: fontawesome/solid/angle-right
    repo: fontawesome/brands/git-alt
    annotation: material/chevron-right-circle
关于网站基础功能(features),material 为我们提供了大量选择
下面将说明我们具体能改些什么,同时给出传送门,如有需求即可前往查询配置(其实是懒得打
非面面俱到,只挑自己会的 🤷♂️
-
 更改配色
更改配色
- 主题色、强调色和亮暗色模式的配色
- 自定义颜色
-
更改字体
常规字体 | 自定义字体
-
 更改语言
更改语言
默认语言 | 多语言选择 | 自定义翻译
-
更改图标
网页 LOGO | 导航栏图标 | 按钮 icon
-
导航栏设置
跳转快速加载 | URL 锚点追踪 | 导航栏位置
左侧导航栏折叠/展开 | 导航修剪
index 页设置 | 目录集成
目录跟踪 | 快速返回 | 页面宽度 -
 强迫症补齐
强迫症补齐
除了基础设定,material 还提供了一些 plugins 以提高幸福度
对于我使用的 search、blog 和 statistics 插件见后
至于其他插件,目前没用过也没需求,不会捏 😋
可以自己折腾一下,到这里其实应该能看出官网写的是很很清晰惹
mkdocs 的一大特色便是富文本下 md 文件的静态渲染,其中 pyMarkdown 功不可没
用法可见我的 pyMarkdown 速记(1) ,而这里与 Reference 对应说明配置
- 建议全部配置结束后再去折腾

您可以增加
-
-
-
-
-
-
-
-
-
-
-
-
-
-
公式(
MathJax|KaTeX二选一即可,我选择了后者)
docs/javascripts/mathjax.jswindow.MathJax = { tex: { inlineMath: [["\\(", "\\)"]], displayMath: [["\\[", "\\]"]], processEscapes: true, processEnvironments: true }, options: { ignoreHtmlClass: ".*|", processHtmlClass: "arithmatex" } }; document$.subscribe(() => { MathJax.startup.output.clearCache() MathJax.typesetClear() MathJax.texReset() MathJax.typesetPromise() })docs/javascripts/katex.jsdocument$.subscribe(({ body }) => { renderMathInElement(body, { delimiters: [ { left: "$$", right: "$$", display: true }, { left: "$", right: "$", display: false }, { left: "\\(", right: "\\)", display: false }, { left: "\\[", right: "\\]", display: true } ], }) })mkdocs.ymlmarkdown_extensions: - pymdownx.arithmatex: generic: true extra_javascript: - javascripts/mathjax.js - https://unpkg.com/mathjax@3/es5/tex-mml-chtml.js - javascripts/katex.js - https://unpkg.com/katex@0/dist/katex.min.js - https://unpkg.com/katex@0/dist/contrib/auto-render.min.js extra_css: - https://unpkg.com/katex@0/dist/katex.min.css
extra:其他设置,如 analytics 分析,页脚设置
extra_javascript | extra_css :额外的 js 文件和 css 文件,用于自添加
我的配置
.yml 配置
比较凌乱(因为当初复制粘贴的时候看不懂),只是参考,推荐大家基于官方文档慢慢配置
# 项目信息_
# 站点作者_
site_author: dixi
# 站名_
site_name: dixi's BLOG
# 站点地址_
# site_url: https://localhost:8000/_
site_url: https://dixilog.github.io/

site_description: >- # 项目描述
  Welcome to dixi's BLOG. Ad infinitum, ad aeternum progredi.
# 代码仓库信息
repo_name:  dixiLOG # 仓库名称_
repo_url: https://github.com/dixiLOG/dixiLOG.github.io.git # 仓库地址
# 版权信息
copyright: Copyright © 2024 | powered by dixiLOG | All rights reserved.
# 导航树配置
nav:
  - Home:
    - index.md
    - Build Your Own Blog:
      - build_your_web/index.md
      - build_your_web/access your github.io.md
      - build_your_web/玩转 Material.md
      - build_your_web/feishu2githubPages.md
    - build_your_web/markdown 速记.md
  - NBU-NOTEBOOK:
      - NBU-NOTEBOOK/index.md
      - NBU-NOTEBOOK/S&S.md
  - 随手记[TODO]:
      - 随手记/index.md
  - Chronic Study[TODO]:
      - Chronic Study/index.md
  - NBU_ROCOS:
      - ROCOS/index.md
      - ROCOS/info&ref.md
  - 闲言碎语:
      - blog/index.md

# 主题配置
theme:
  name: material # 主题名称
  # custom_dir: material/overrides # 自定义文件夹,对于个别页面,如果您不想使用主题的默认样式,可以在这里进行修改,使用里面的文件覆盖主题的默认文件。具体可以参考material官方文档
  # logo: https://cdn.jsdelivr.net/gh/dixiLOG/blogStatic/images/logo.png # logo 图片
  favicon: img/favicon.ico  # 网站图标
  language: zh # 语言
  font: # 字体,大概率不需要换
    text: Roboto
    code: Roboto Mono
  palette:
  - media: "(prefers-color-scheme: light)" # 浅色
    scheme: default
    primary: light green
    accent: orange
    toggle:
      icon: material/lightbulb-variant
      name: Switch to dark mode
  - media: "(prefers-color-scheme: dark)" # 深色
    scheme: slate
    primary: blue grey
    accent: amber
    toggle:
      icon: material/lightbulb-variant-outline
      name: Switch to light mode
  icon: # 一些用到的icon
    logo: logo
    previous: fontawesome/solid/angle-left
    next: fontawesome/solid/angle-right
    repo: fontawesome/brands/git-alt
    annotation: material/chevron-right-circle
  # 功能
  features:
    # - header.autohide # 自动隐藏头部
    - navigation.instant # 导航栏快速跳转
    - navigation.tabs # 导航栏多标签
    - navigation.sections # 开启后左侧导航栏不折叠
    - navigation.tracking # 导航栏URL跟踪
    - navigation.footer # 底部导航栏
    - search.highlight # 搜索结果高亮
    # - navigation.expand # 导航栏展开
    - navigation.indexes # 提供概述页面
    - toc.follow # 目录跟随
    # - navigation.tabs # 顶级索引被作为tab
    # - navigation.tabs.sticky # 导航栏始终可见
    # - toc.integrate # 目录集成左边栏
    - navigation.top # 快速回到顶部
    - content.code.annotate # 代码注解
    - content.tooltips # 工具提示
    - search.suggest # 搜索建议
    - search.share # 搜索结果分享
    - content.code.copy # 复制代码按钮
    - navigation.instant.prefetch # 预加载
    - navigation.instant.progress # 进度条
    # - content.action.edit
    # - content.action.view

# 插件配置
plugins:
- glightbox # 图片灯箱
- search: # 搜索
    lang:
      - en
      - zh  # 中文搜索支持
- tags # 标签功能 插件
# - meta-descriptions:
#     export_csv: false
#     quiet: false
#     enable_checks: false
#     min_length: 50
#     max_length: 160
#     trim: false # 元描述插件
- statistics: # 统计功能插件
    page_template: "page_template/page_statistics.html"
    words_per_minute: 200
- blog: # 博客功能插件
    blog_dir: blog
    # blog_toc: true
    post_date_format: full
    archive_toc: true
    categories_toc: true
    archive_name: DIXI的碎碎念流水
    # archive_date_format: MMMM
    category_name: DIXI的碎碎念分类
    # categories_allowed:
      # - 口水鸡  #书 电影
      # - 豆腐脑  #输出观点
      # - 碎碎念  #随笔
    pagination_per_page: 15 # 每页文章数
    # post_excerpt: required # 文章摘要,和下面的配合食用,但不知道为什么我不能开启这一句
    post_excerpt_separator: <!-- more -->
    pagination_format: "$link_first $link_previous ~2~ $link_next $link_last"   # 页码格式_
    # pagination_keep_content: true   # 保留分页内容
    # draft_if_future_date: true # 草稿发布日期大于当前日期则发布为草稿
    post_readtime: false   # 关闭阅读时间
    # post_readtime_words_per_minute: 300

# - git-revision-date-localized:
#     enable_creation_date: true # 启用创建日期
#     enable_last_updated_date: true # 启用最后更新日期
#     fallback_to_build_date: false # 启用日期,如果没有git信息,则使用构建日期
#     format: "%Y-%m-%d" # 日期格式化
#     locale: zh_CN # 语言

# mk扩展配置_
markdown_extensions:
  - toc:      # 目录
      permalink: true
      toc_depth: 4
      title: Contents
  # - meta
  - abbr
  - tables
  - def_list
  - attr_list
  - md_in_html
  - sane_lists
  - admonition
  - pymdownx.keys
  - pymdownx.mark #支持高亮标记文本
  - pymdownx.tilde
  - pymdownx.critic
  - pymdownx.details
  - pymdownx.snippets
  - pymdownx.magiclink
  - pymdownx.superfences
  - pymdownx.inlinehilite
  - markdown.extensions.attr_list
  - pymdownx.smartsymbols
  - pymdownx.arithmatex
  - pymdownx.caret
  - footnotes

  - pymdownx.betterem:     # 改进的强调
      smart_enable: all
  - pymdownx.emoji:
      emoji_index: **!!python/name:material.extensions.emoji.twemoji**
      emoji_generator: **!!python/name:material.extensions.emoji.to_svg**
  - pymdownx.tabbed:      # 标签页
      alternate_style: true
  - pymdownx.tasklist:    # 任务列表
      custom_checkbox: true
  - pymdownx.highlight:    # 代码高亮
      anchor_linenums: true
  - pymdownx.arithmatex:  # 数学公式
      generic: true
  - pymdownx.superfences:    # diagrams | 流程图
      custom_fences:
      - name: mermaid
        class: mermaid
        format: **!!python/name:pymdownx.superfences.fence_code_format**

# 其他配置
extra:
  social:
    - icon: fontawesome/brands/github
      link: https://github.com/dixiLOG
      name: 我滴GitHub
  analytics:
    provider: google
    property: G-WNP42HF8NE
    feedback:
      title: Looking for your feedback!
      ratings:
        - icon: material/thumb-up-outline
          name: This page was helpful
          data: 1
          note: >**-**
           O(∩_∩)O谢谢啦~
        - icon: material/thumb-down-outline
          name: This page could be improved
          data: 0
          note: >**-**
            嘿呀嘿呀,努力搬砖...

# 额外的js文件和css文件
extra_javascript:
  # 自定义js文件,一定要放在最后面,不然会覆盖掉主题的js文件
  # - https://www.gstatic.com/firebasejs/8.10.0/firebase-app.js
  # - https://www.gstatic.com/firebasejs/8.10.0/firebase-auth.js
  - javascripts/extra.js
  - https://imgbb.com/upload.js
  - javascripts/katex.js
  - https://unpkg.com/katex@0/dist/katex.min.js
  - https://unpkg.com/katex@0/dist/contrib/auto-render.min.js
  - javascripts/mathjax.js
  - https://unpkg.com/mathjax@3/es5/tex-mml-chtml.js

  # - '//busuanzi.ibruce.info/busuanzi/2.3/busuanzi.pure.mini.js'
extra_css:
  - stylesheets/extra.css
  - https://cdn.jsdelivr.net/npm/lxgw-wenkai-webfont@1.1.0/style.css
  - https://unpkg.com/katex@0/dist/katex.min.css
到此基本配置结束
后面的功能就是选做啦
giscus 评论模块
这篇教程说的已然是非常清楚,我就不照搬了
如果教程的方法 OK ,那就不需要往下看啦
我的问题
我发现本地渲染下正常而托管发布后评论模块不显示
没找到原因,于是我换了个思路
因为我并没有每篇都需要加评论的需求(实际上只有 HOME 页),干脆就改成了 HTML 嵌入
在需要的页面中添加
<!-- Giscus 评论功能 -->
<div id="giscus-container"></div>

<script src="https://giscus.app/client.js"
        data-repo="..."
        data-repo-id="..."
        data-category="Announcements"
        data-category-id="..."
        data-mapping="pathname"
        data-strict="0"
        data-reactions-enabled="0"
        data-emit-metadata="0"
        data-input-position="bottom"
        data-theme="preferred_color_scheme"
        data-lang="zh-CN"
        crossorigin="anonymous"
        async>
</script>

<script>
    document.addEventListener("DOMContentLoaded", **function**() {
        **var** feedbackSection = document.querySelector('md-feedback'); // 确保选择器正确
        **var** giscusContainer = document.querySelector('#giscus-container');

        if (feedbackSection && giscusContainer) {
            // 调试输出
            console.log('Feedback section found:', feedbackSection);
            console.log('Giscus container found:', giscusContainer);

            // 确保 feedbackSection 在页面中
            if (feedbackSection.parentNode) {
                feedbackSection.parentNode.appendChild(giscusContainer); // 尝试 appendChild
            }
        } else {
            console.log('Feedback section or Giscus container not found.');
        }

        // 设置初始主题
        **var** palette = __md_get("__palette");
        **var** theme = palette && palette.color.scheme === "slate" ? "dark" : "light";
        **var** giscusScript = document.querySelector("#giscus-container script");
        if (giscusScript) {
            giscusScript.setAttribute("data-theme", theme);
        }

        // 注册主题切换事件
        **var** paletteToggle = document.querySelector("[data-md-component=palette]");
        if (paletteToggle) {
            paletteToggle.addEventListener("change", **function**() {
                **var** newPalette = __md_get("__palette");
                **var** newTheme = newPalette && newPalette.color.scheme === "slate" ? "dark_dimmed" : "light_high_contrast";
                // 主题颜色
                // | 'light'
                // | 'light_high_contrast'
                // | 'light_protanopia'
                // | 'dark'
                // | 'dark_high_contrast'
                // | 'dark_protanopia'
                // | 'dark_dimmed'
                // | 'transparent_dark'

                // 更新 Giscus 评论主题
                **var** giscusFrame = document.querySelector("iframe.giscus-frame");
                if (giscusFrame) {
                    giscusFrame.contentWindow.postMessage(
                        { giscus: { setConfig: { theme: newTheme } } },
                        "https://giscus.app"
                    );
                }

            });
        }
    });
</script>
高亮的三行改成自己的即可
Google Analytics & firebase 身份认证
首先您需要注册一个 Google Analytics 的账号并创建一个与网站绑定的数据流,最终得到一个 ID,就在下图的框框里
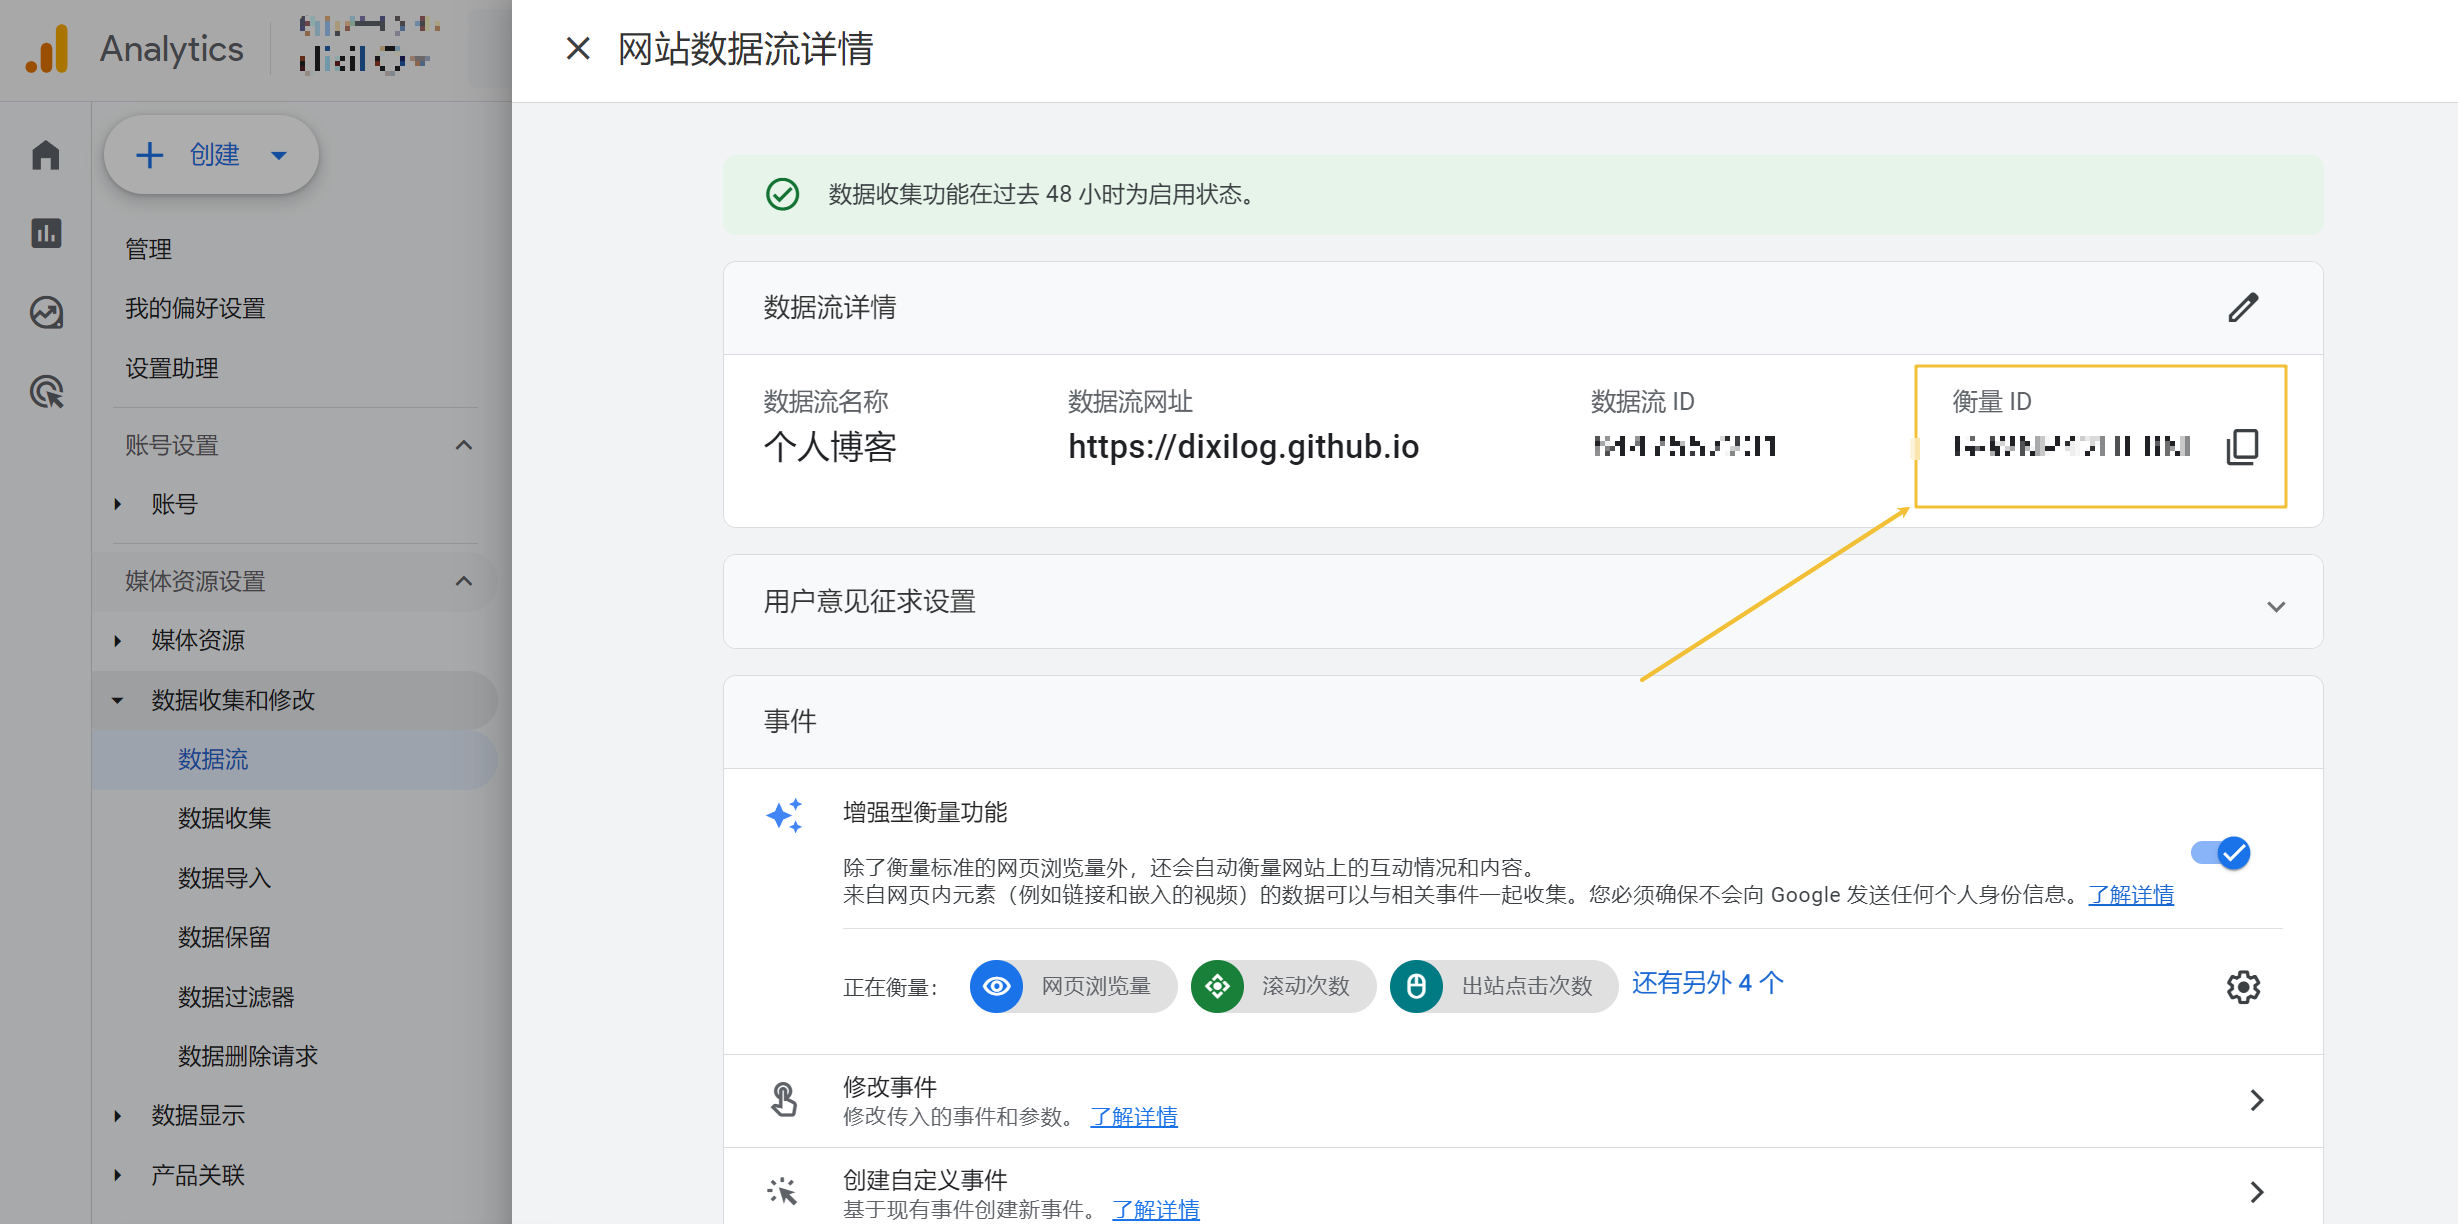
如果有问题,可以看看 support.google.com 或者其他类似的帮助文档
然后在 extra 字段配置即可
后续网站上所有的操作都会被记录下来了
下面是基于 firebase 的身份认证,对于一个开源的项目来说并没有啥意义,但做都做了就记录一下咯
原理十分简单,即用第三方平台管理账号密码,并监视被保护页,遇到未登录用户跳转至登陆页面
同样的,您需要先拥有一个与网页绑定的 firebase 账号
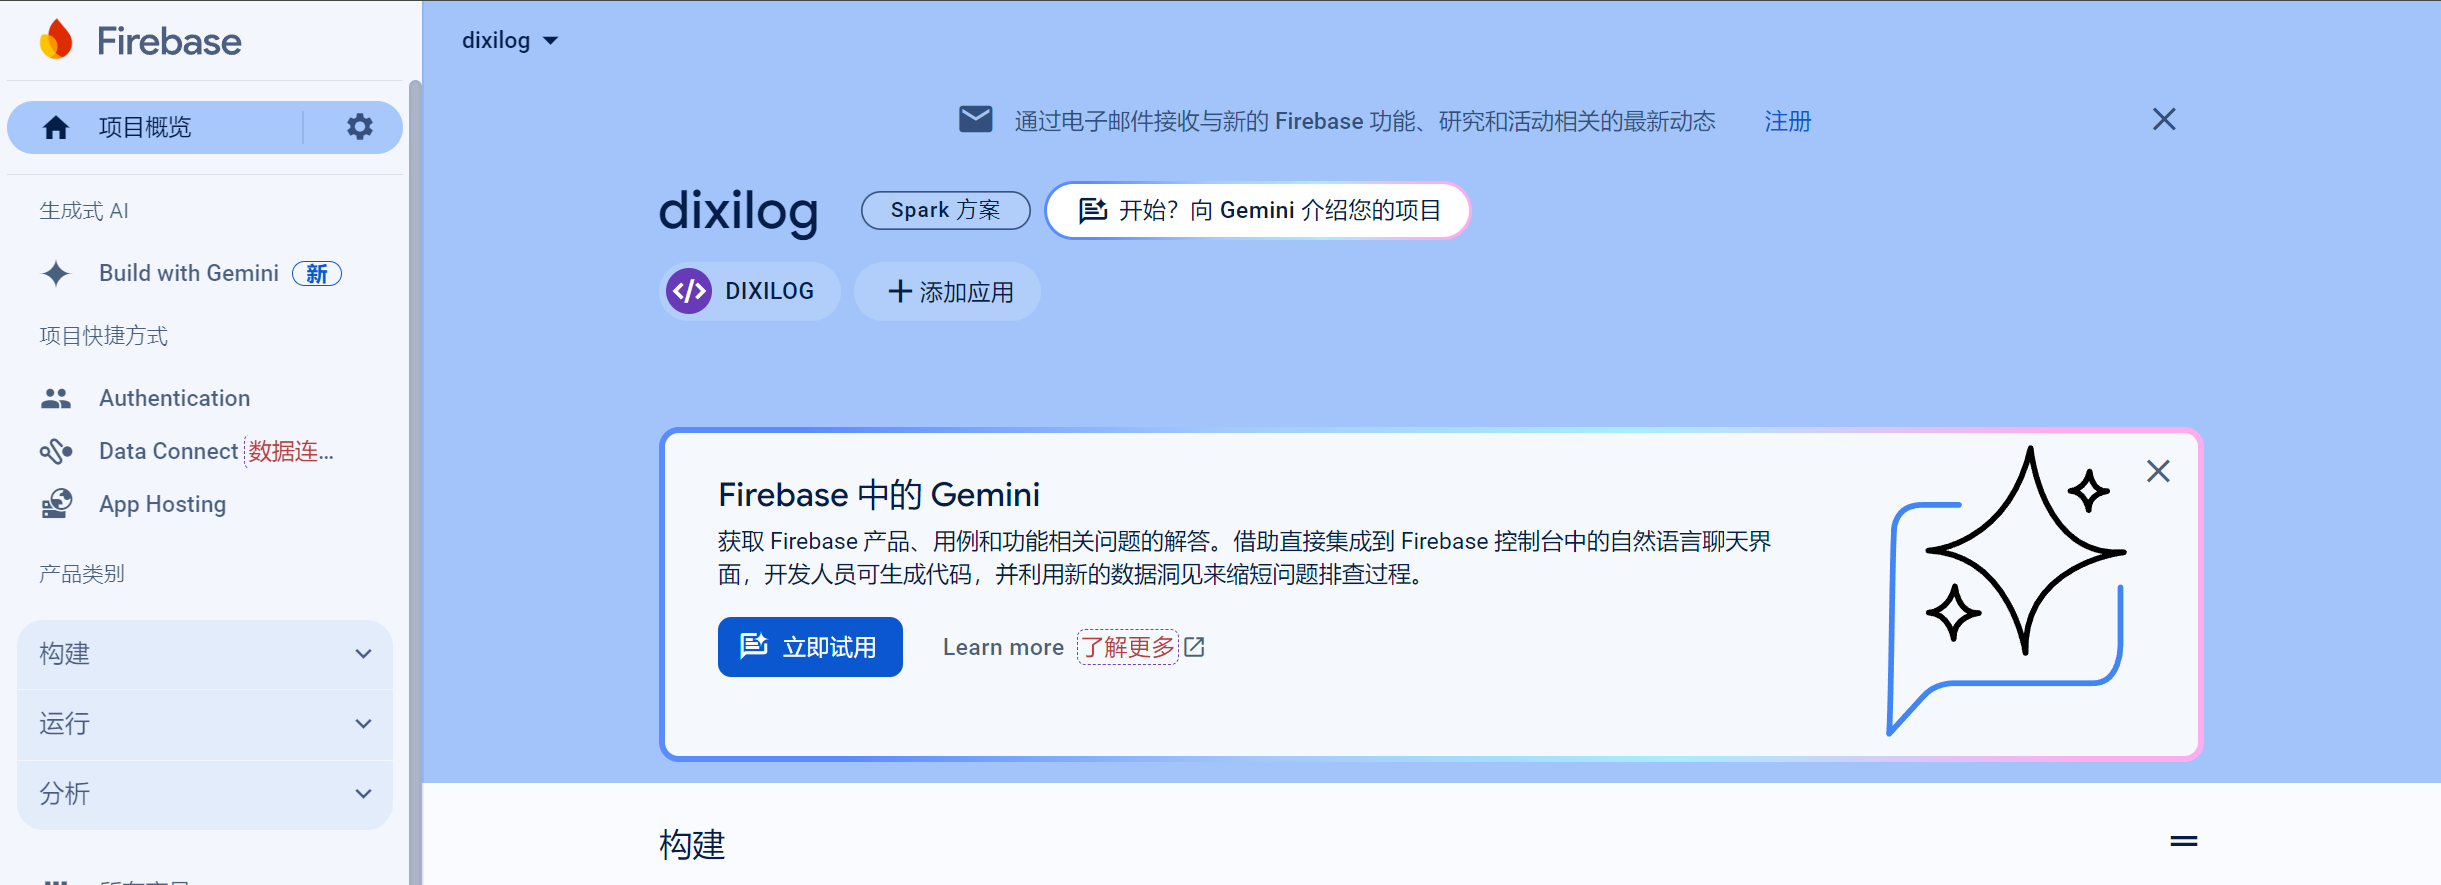
如果是第一次登陆,则无任何项目,所以下一步就是创建一个新的项目
找到"创建项目",输入您的名称,继续
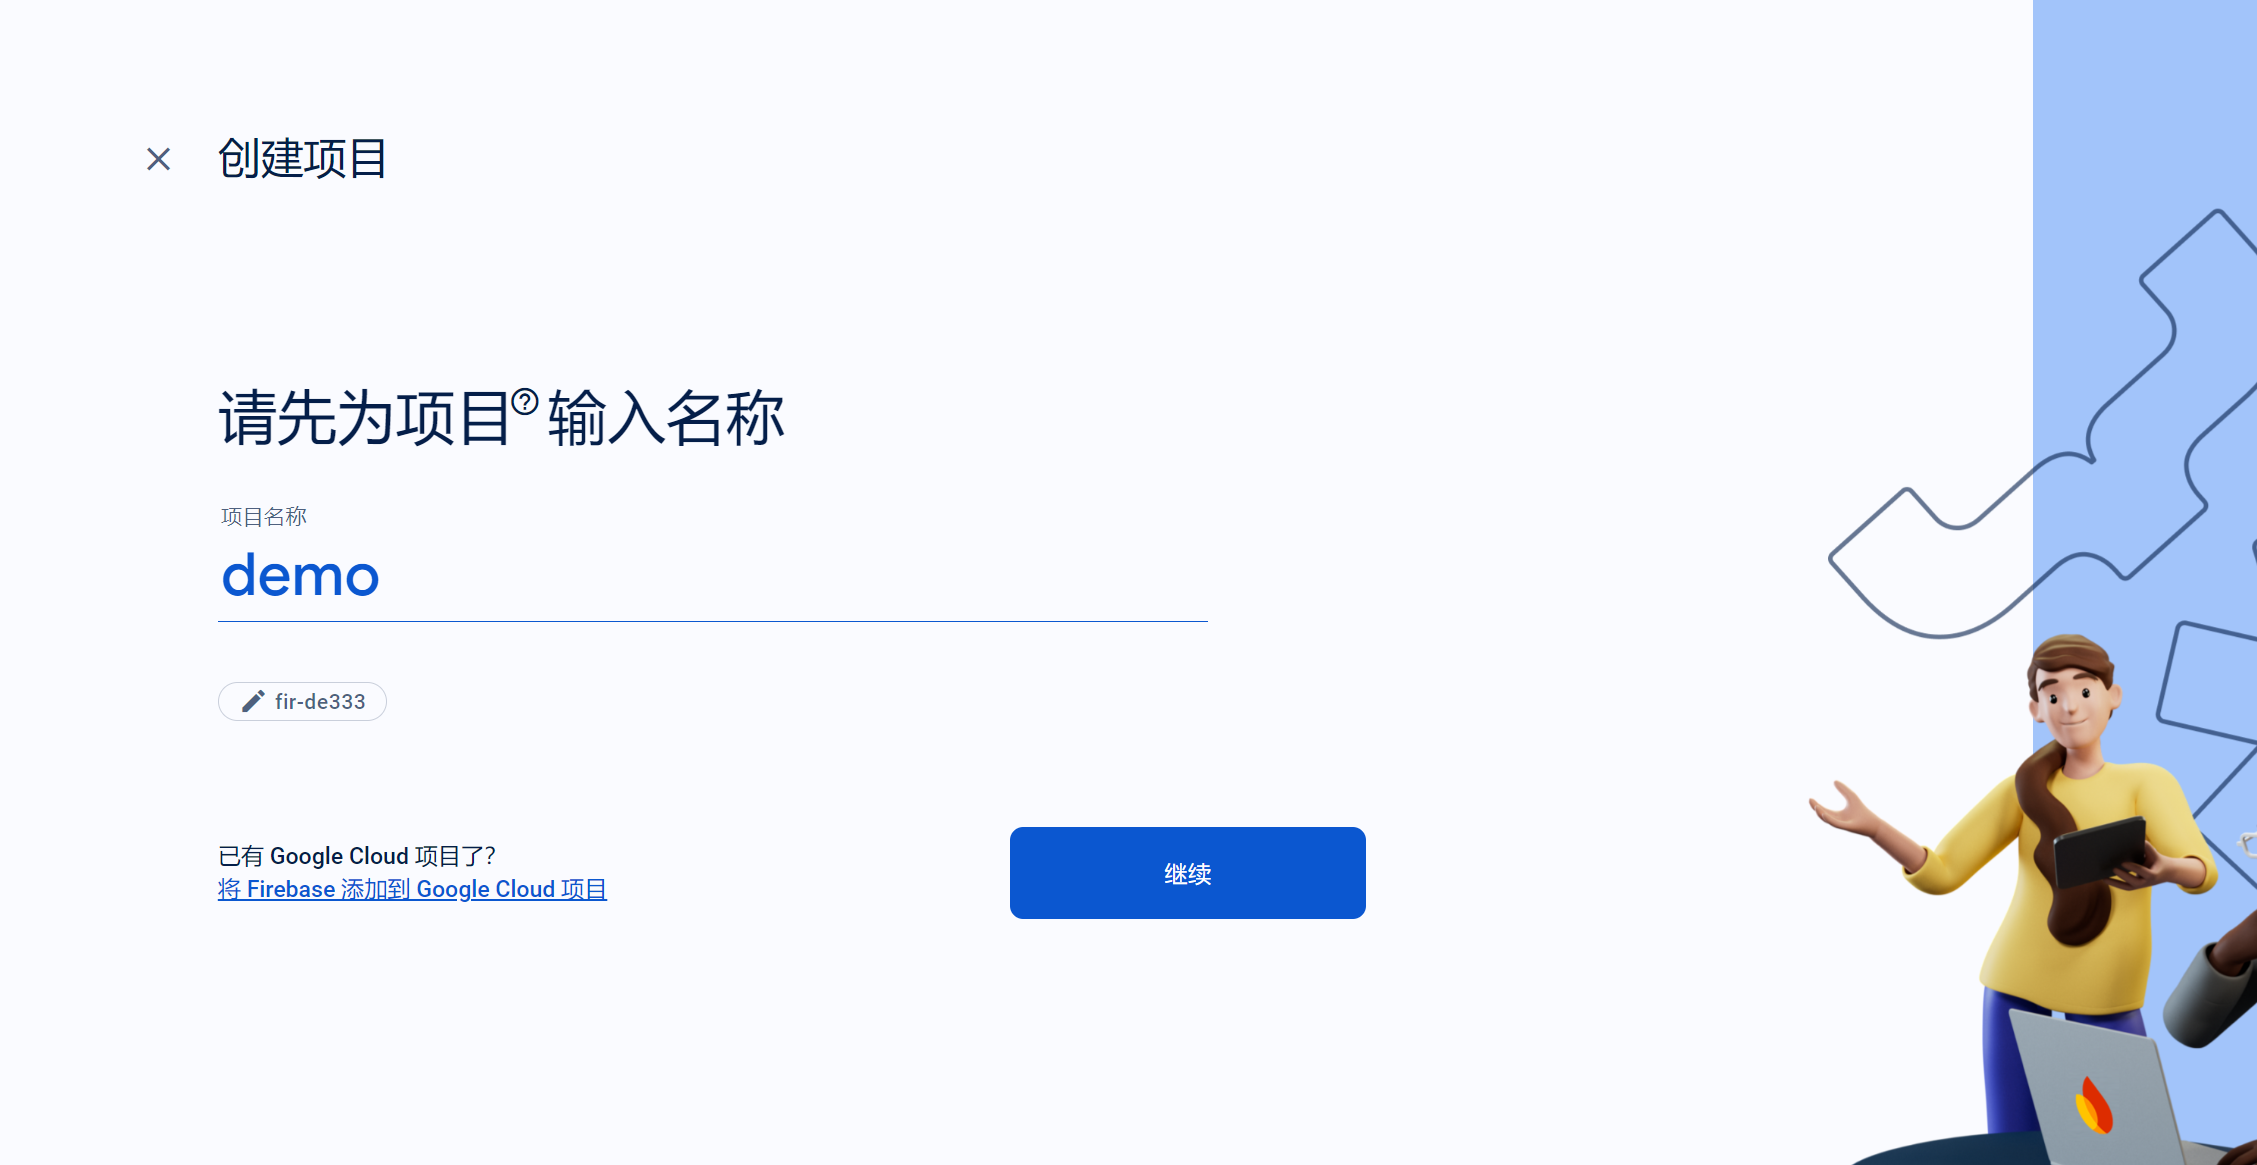
勾选 Analytics,继续

选择账号,创建项目

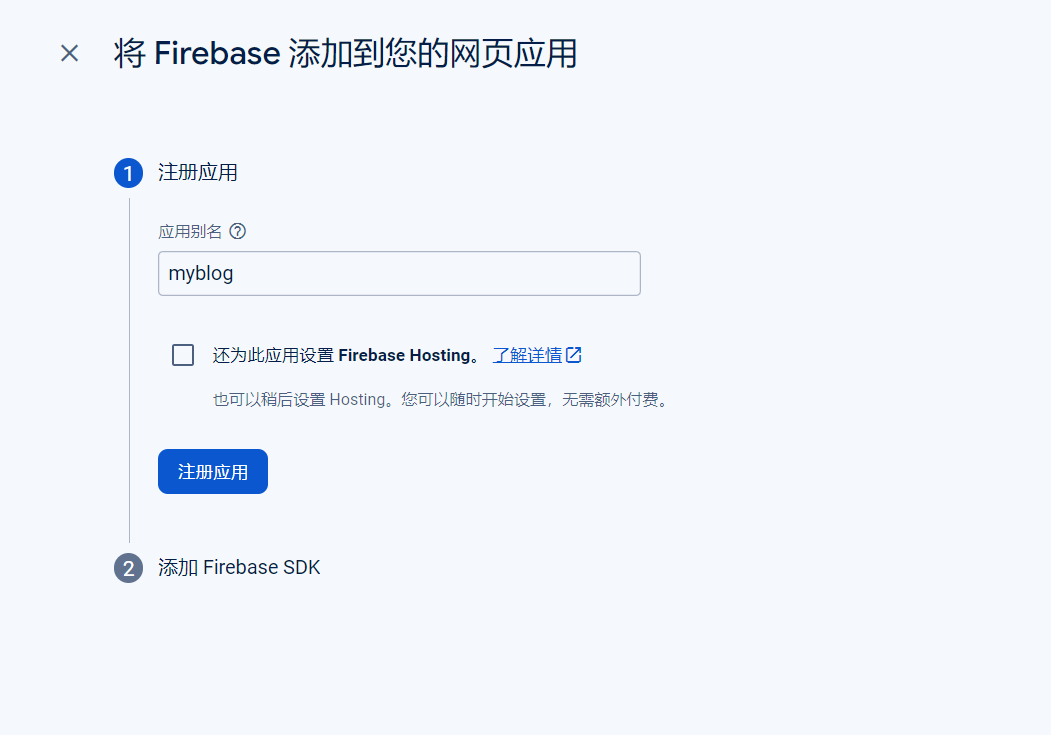
转完圈圈,选择网页创建新的应用
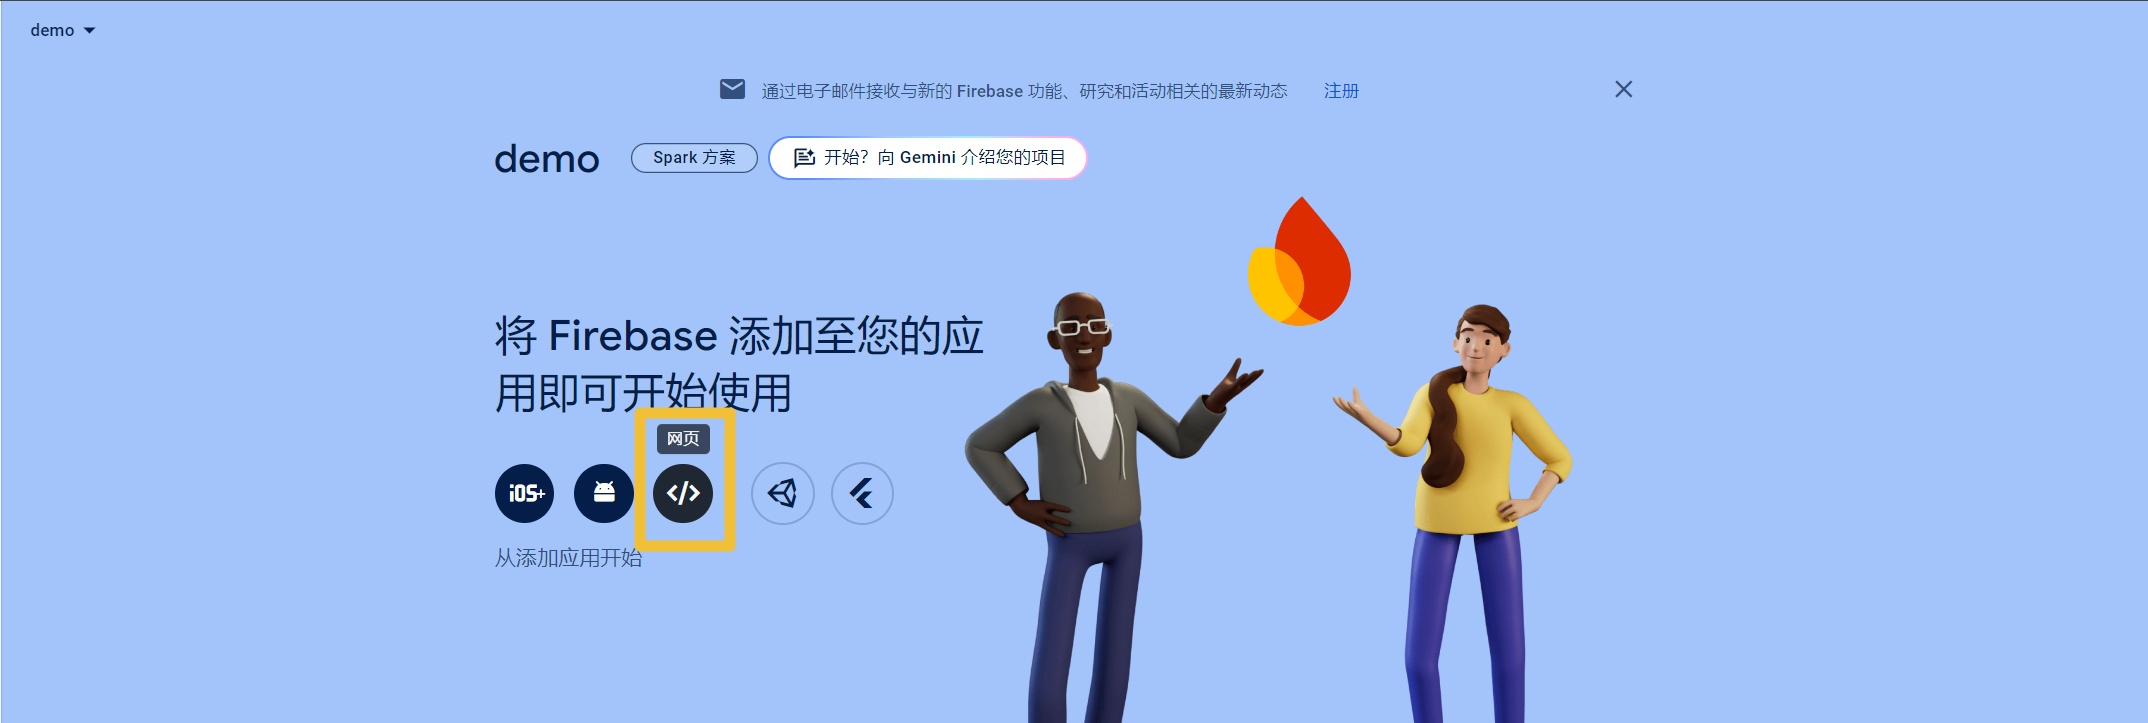
输入名称,勾选 hosting ,创建即可
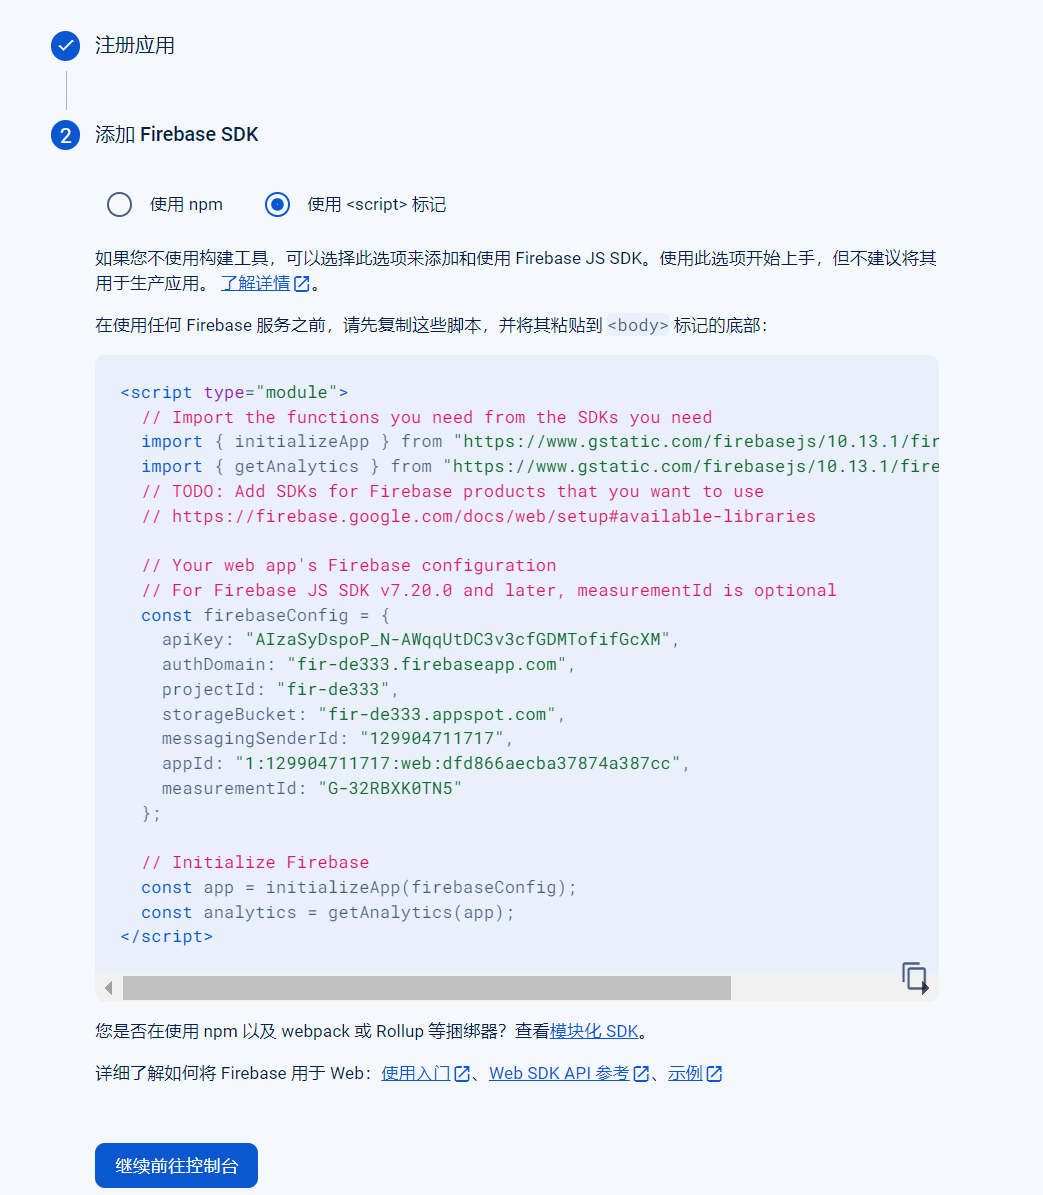
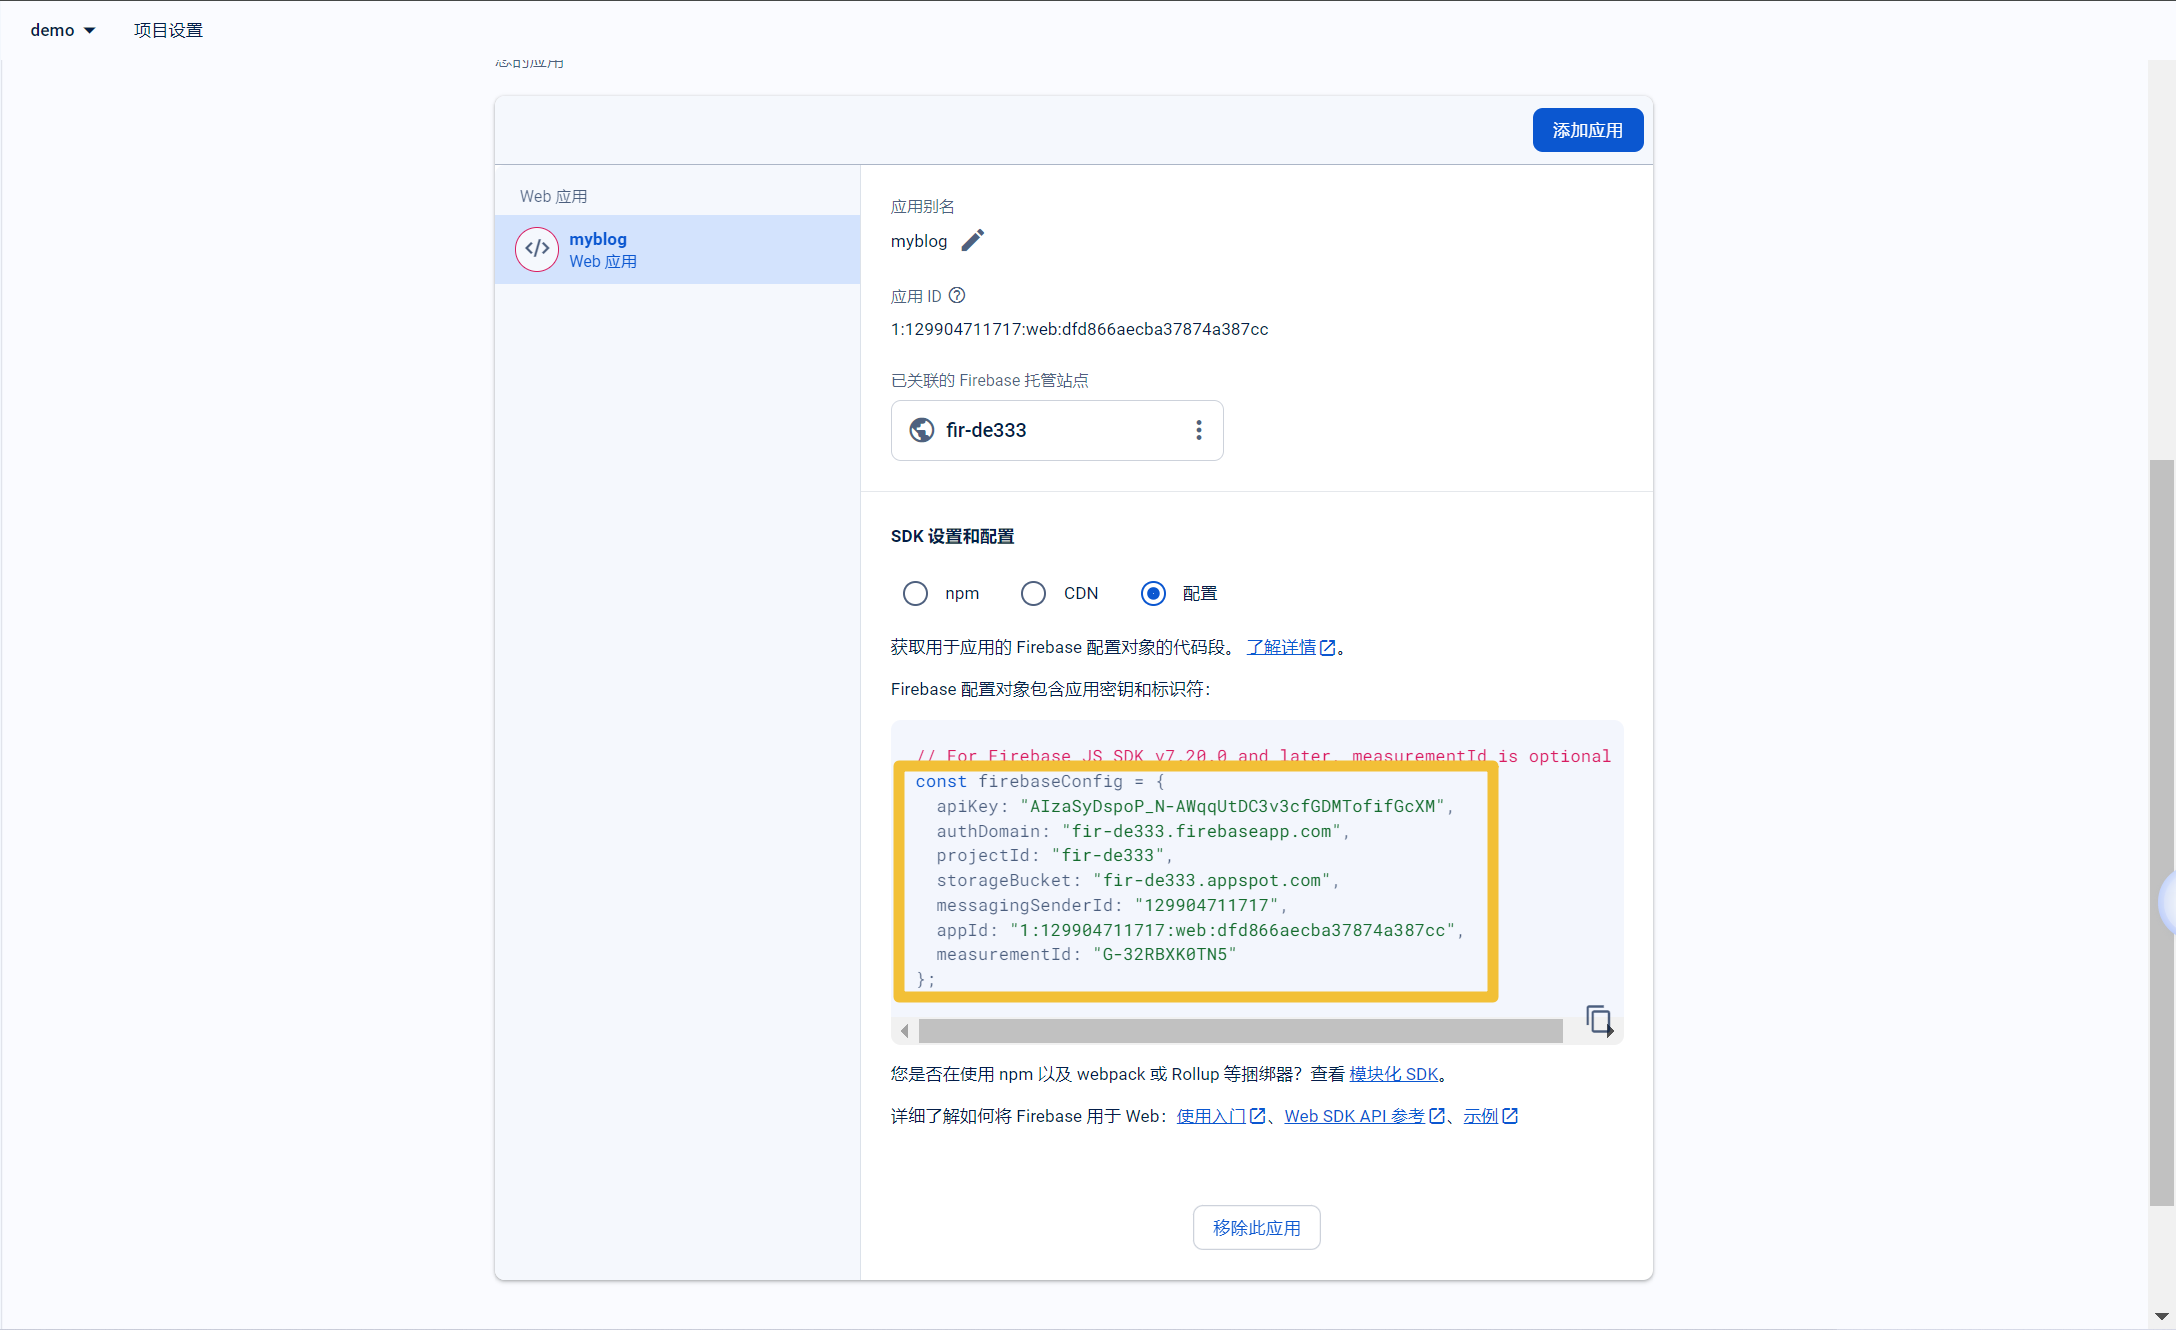
进入应用的设置界面下拉,得到配置段
左边导航栏选择 Authentic 进入后即可开始配置
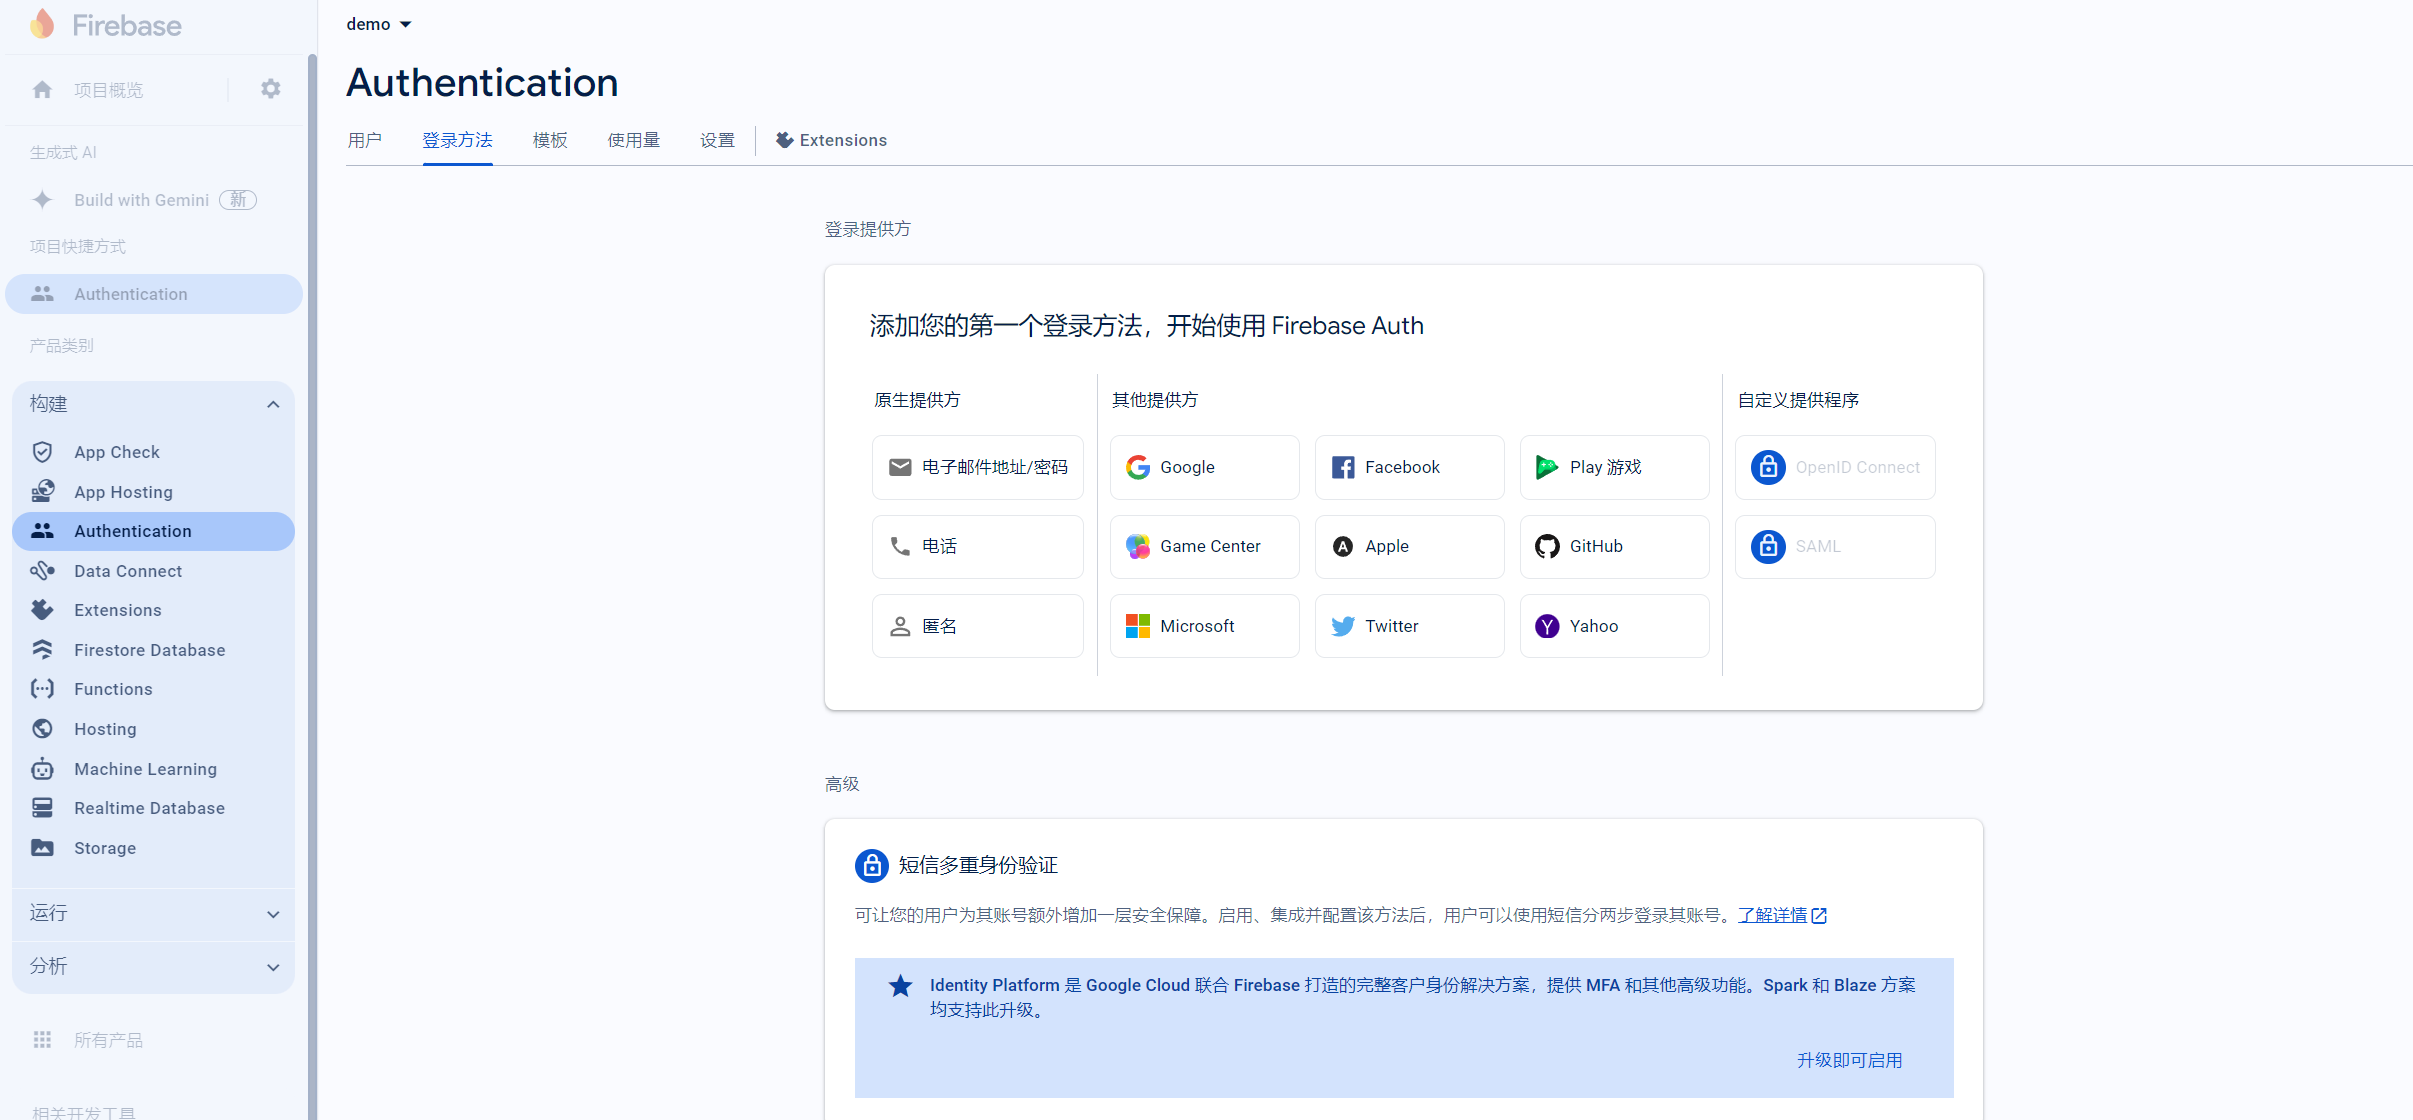
下面是我的配置
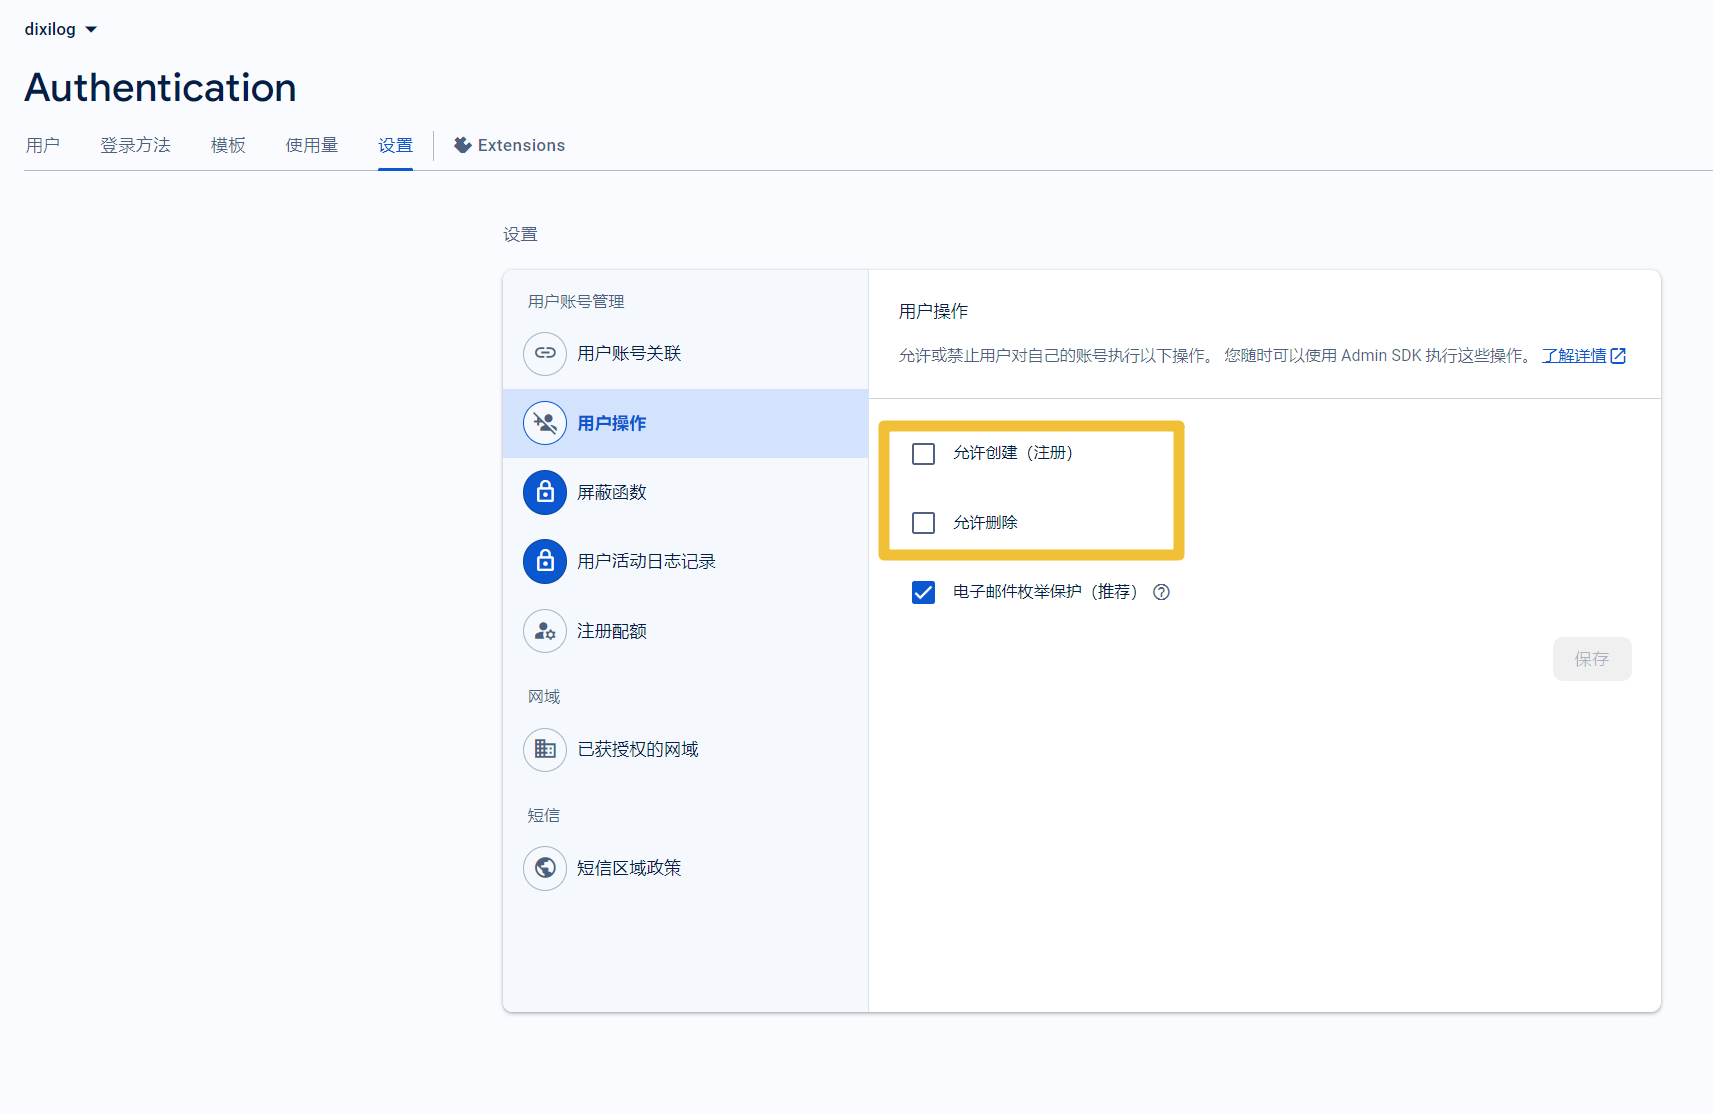
选择电子邮件/密码登陆,创建一个用户
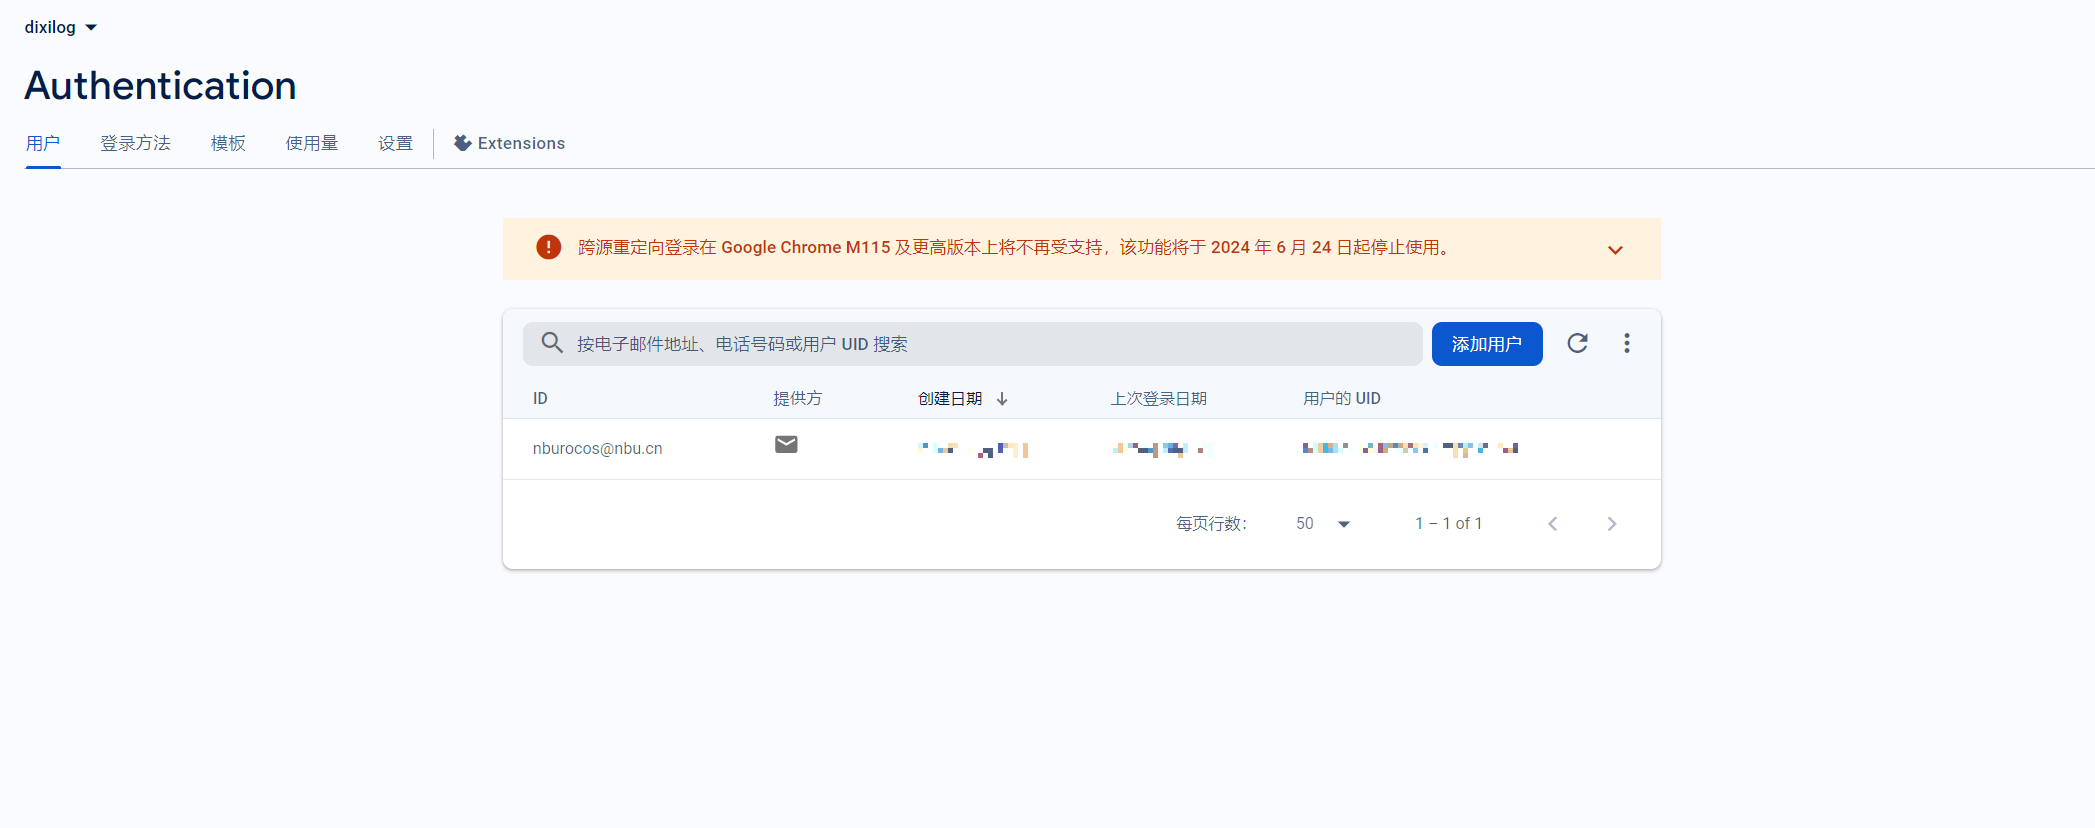
设置为只登陆(因为是身份认证)
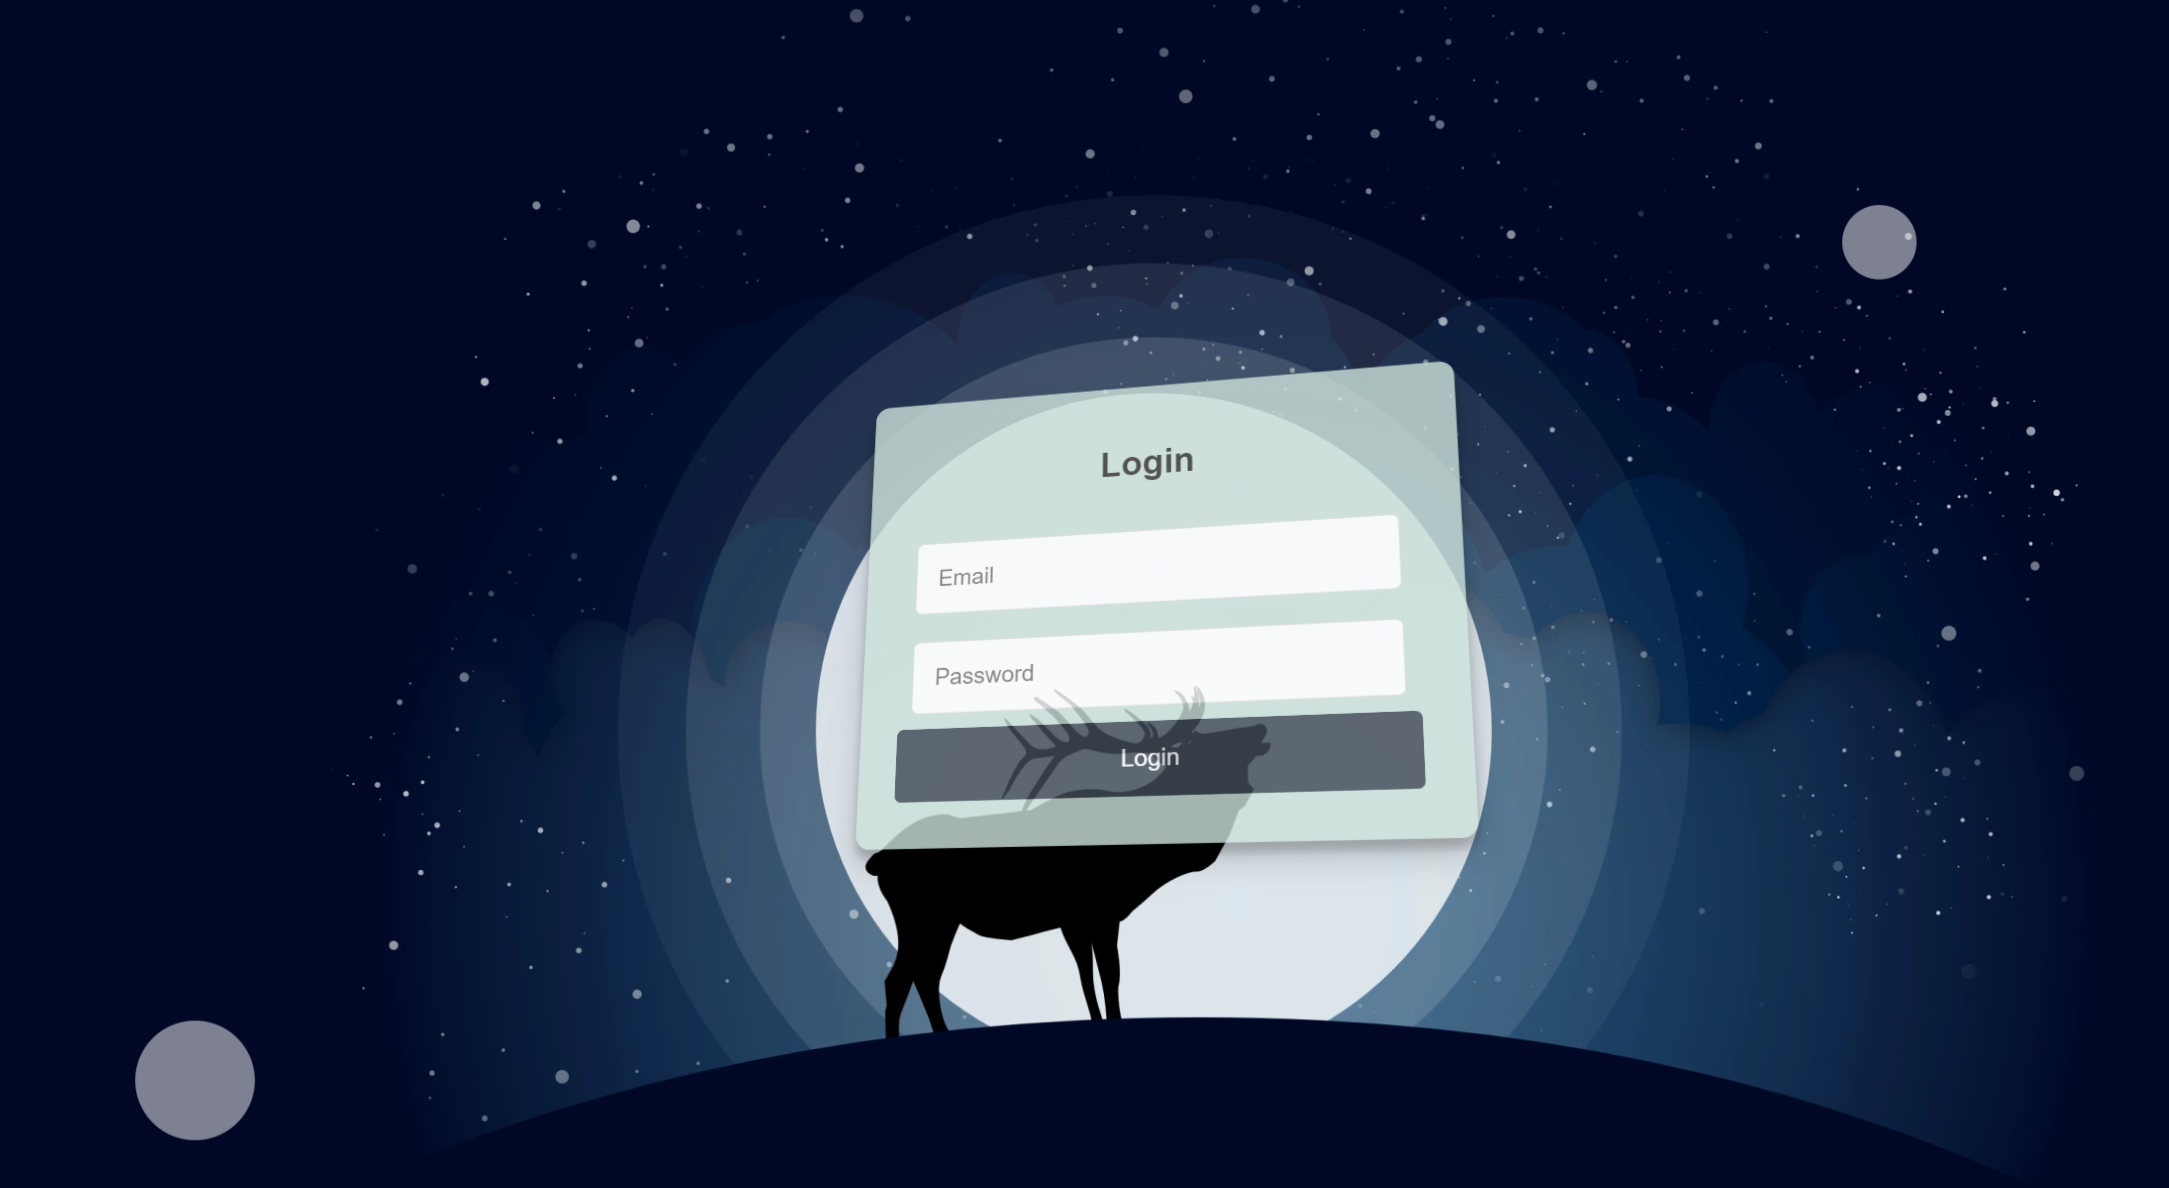
接着配置网页端
在需要保护页面所在目录下新建 login.html
<!DOCTYPE html>
<html lang="en">
<head>
    <meta charset="UTF-8">
    <meta name="viewport" content="width=device-width, initial-scale=1.0">
    <title>Login</title>
    <style>
        body {
            font-family: Arial, sans-serif;
            background: url('rocos_img/zmbz.png') no-repeat center center fixed; /* 替换为您的本地图像路径 */
            background-size: cover;
            display: flex;
            justify-content: center;
            align-items: center;
            height: 100vh;
            margin: 0;
            animation: backgroundAnimation 10s infinite alternate;/* 背景动画 */
        }

        /* 背景动画,渐隐和缩放效果 */
        @keyframes backgroundAnimation {
            0% {
                opacity: 0.8;
                transform: scale(1);
            }
            50% {
                opacity: 1;
                transform: scale(1.05);
            }
            100% {
                opacity: 0.8;
                transform: scale(1);
            }
        }

        #login-form {
            background: rgba(204, 224, 217, 0.98); /* 调整背景颜色的透明度 */
            border-radius: 10px;
            box-shadow: 0 10px 20px rgba(0, 0, 0, 0.2), 0 6px 6px rgba(0, 0, 0, 0.22); /* 增强阴影效果 */
            padding: 30px;
            width: 100%;
            max-width: 350px;
            text-align: center;
            animation: formAnimation 2s ease-in-out; /* 登录表单的进入动画 */
            transition: transform 0.1s ease-out; /* 添加平滑过渡 */
            transform-style: preserve-3d; /* 保留 3D 变换效果 */
        }

        _/* 表单动画,淡入效果 */_
        @keyframes formAnimation {
            0% {
                opacity: 0;
                transform: translateY(-20px);
            }
            100% {
                opacity: 1;
                transform: translateY(0);
            }
        }

        #login-form h2 {
            margin-bottom: 20px;
            color: #333;
            font-size: 24px;
            transform: translateZ(20px); /* 增加 Z 轴位移以显示厚度 */
        }

        #login-form input {
            width: calc(100% - 20px);
            padding: 15px;
            margin: 10px 0;
            border: 1px solid #ddd;
            border-radius: 5px;
            font-size: 16px;
            box-sizing: border-box;
            transition: box-shadow 0.3s ease; /* 输入框焦点动态效果 */
            transform: translateZ(10px); /* 增加 Z 轴位移以显示厚度 */
        }
        #login-form input:focus {
            box-shadow: 0 0 8px rgba(0, 123, 255, 0.5);
        }

        #login-form button {
            width: 100%;
            padding: 15px;
            font-size: 16px;
            border: none;
            border-radius: 5px;
            background-color: #414b56;
            color: #fff;
            cursor: pointer;
            transition: background-color 0.3s ease, transform 0.3s ease; /* 按钮的动态效果 */
            transform: translateZ(10px); /* 增加 Z 轴位移以显示厚度 */
        }
        #login-form button:hover {
            background-color: #e7d362;
            transform: translateZ(10px) translateY(-2px);
        }
        #login-form p {
            margin-top: 15px;
            font-size: 14px;
            color: #555;
            transform: translateZ(10px); /* 增加 Z 轴位移以显示厚度 */
        }
        #login-form a {
            color: #007bff;
            text-decoration: none;
            transform: translateZ(10px); /* 增加 Z 轴位移以显示厚度 */
        }
        #login-form a:hover {
            text-decoration: underline;
        }

        /* 添加一些漂浮的装饰元素 */
        .floating-element {
            position: absolute;
            background-color: rgba(255, 255, 255, 0.6);
            border-radius: 50%;
            animation: floatingAnimation 6s infinite ease-in-out;
        }

        @keyframes floatingAnimation {
            0% {
                transform: translateY(0);
            }
            50% {
                transform: translateY(-15px);
            }
            100% {
                transform: translateY(0);
            }
        }

        /* 定义不同大小和位置的漂浮元素 */
        .floating-element:nth-child(1) {
            width: 80px;
            height: 80px;
            bottom: 10%;
            left: 10%;
            animation-duration: 4s;
        }

        .floating-element:nth-child(2) {
            width: 50px;
            height: 50px;
            top: 20%;
            right: 20%;
            animation-duration: 7s;
        }

        .floating-element:nth-child(3) {
            width: 100px;
            height: 100px;
            top: 40%;
            left: 50%;
            animation-duration: 5s;
        }
    </style>
</head>
<body>
    <!-- 漂浮的装饰元素 -->
    <div class="floating-element"></div>
    <div class="floating-element"></div>
    <div class="floating-element"></div>

    <form id="login-form" onsubmit="return login();">
        <h2>Login</h2>
        <input type="email" id="email" placeholder="Email" required>
        <input type="password" id="password" placeholder="Password" required>
        <button type="submit">Login</button>
    </form>

    <script src="https://www.gstatic.com/firebasejs/8.10.0/firebase-app.js"></script>
    <script src="https://www.gstatic.com/firebasejs/8.10.0/firebase-auth.js"></script>
    <script>
        **const** firebaseConfig = {
            apiKey: "XXXXXXXXXXXXXXXXXXXXXX",
            authDomain: "XXXXXXXXXXXXXXXXXX",
            projectId: "XXXXXX",
            storageBucket: "XXXXXXXXXXXXXXXXXX",
            messagingSenderId: "XXXXXXXXX",
            appId: "XXXXXXXXXXXXXX",
            measurementId: "XXXXXXXXXXXXXXXX"
        };
        if (!firebase.apps.length) {
            firebase.initializeApp(firebaseConfig);
        }

        **function** login() {
            **const** email = document.getElementById("email").value;
            **const** password = document.getElementById("password").value;

            firebase.auth().signInWithEmailAndPassword(email, password)
                .then((userCredential) **=>** {
                    window.location.href = '../ROCOS'; // 登录成功后跳转到受保护内容的入口页面
                })
                .catch((error) **=>** {
                    **const** errorMessage = error.message;

                    if (errorMessage.includes("INVALID_LOGIN_CREDENTIALS")) {
                        alert("邮箱或密码填写错误,请重试");
                    } else if (errorMessage.includes("EMAIL_NOT_FOUND")) {
                        alert("该邮箱不存在,请检查输入或注册新账户");
                    } else if (errorMessage.includes("USER_DISABLED")) {
                        alert("此用户账户已被禁用");
                    } else {
                        alert(`登录失败: ${errorMessage}`);
                    }
                    window.location.href = '../'; // 可根据需要删除或修改这行
                });

            return false; _// 阻止表单提交_
        }

        firebase.auth().onAuthStateChanged((user) **=>** {
            if (user) {
                window.location.href = '../ROCOS'; // 已登录用户直接跳转到受保护内容的入口页面
            }
        });

        // 添加鼠标移动事件监听器
        document.addEventListener("mousemove", **function** (e) {
            **const** loginForm = document.getElementById("login-form");
            **const** rect = loginForm.getBoundingClientRect();
            **const** x = e.clientX - rect.left - rect.width / 2;
            **const** y = e.clientY - rect.top - rect.height / 2;

            **const** rotateX = -(y / rect.height) * 15; // 根据鼠标位置计算旋转角度
            **const** rotateY = (x / rect.width) * 15;

            loginForm.style.transform = `perspective(1000px) rotateX(${rotateX}deg) rotateY(${rotateY}deg)`;
        });
    </script>
</body>
</html>
内容多是因为添加了一些花里胡哨的功能,如卡片跟随倾角,周期动画
在需要保护的界面中添加监视
<!-- 引入 Firebase SDK -->
<script src="https://www.gstatic.com/firebasejs/8.10.0/firebase-app.js"></script>
<script src="https://www.gstatic.com/firebasejs/8.10.0/firebase-auth.js"></script>

<script>
    // 确保 Firebase 只初始化一次
    if (!firebase.apps.length) {
        **const** firebaseConfig = {
            apiKey: "XXXXXXXXXXXXXXXXXXXXXX",
            authDomain: "XXXXXXXXXXXXXXXXXX",
            projectId: "XXXXXX",
            storageBucket: "XXXXXXXXXXXXXXXXXX",
            messagingSenderId: "XXXXXXXXX",
            appId: "XXXXXXXXXXXXXX",
            measurementId: "XXXXXXXXXXXXXXXX"
        };
        firebase.initializeApp(firebaseConfig);
    }

    // 监听用户登录状态
    firebase.auth().onAuthStateChanged((user) **=>** {
        if (user) {
            // 输出调试信息
            console.log('User already logged in, redirecting...');
            // alert('您已登录,为您自动跳转~');
        } else {
            // 输出调试信息
            console.log('User not logged in, redirecting to login.html');
            window.location.href = '../login.html'; // 未登录用户跳转到登录页
        }
    });
</script>
如此,当未登录用户点击时就会跳转 login.html
而成功登陆之后,即可根据 cookie 自动登陆
基于 blog 插件的博客模块
在根目录下打开 powershell
写入作者信息
authors:
    dixi:
        name: dixi        # Author name
        description: 略略略😋 # Author description
        avatar: /img/favicon.ico
字段不多解释,具体见 Built-in blog plugin
- blog: # 博客功能插件
    blog_dir: blog
    # blog_toc: true
    post_date_format: full
    archive_toc: true
    categories_toc: true
    archive_name: DIXI的碎碎念流水
    # archive_date_format: MMMM
    category_name: DIXI的碎碎念分类
    # categories_allowed:      # 允许的分类
      # - 口水鸡  #书 电影
      # - 豆腐脑  #输出观点
      # - 碎碎念  #随笔
    pagination_per_page: 15 # 每页文章数_
    # post_excerpt: required # 文章摘要,和下面的配合食用,但不知道为什么我不能开启这一句
    post_excerpt_separator: <!-- more -->
    pagination_format: "$link_first $link_previous ~2~ $link_next $link_last"   # 页码格式_
    # pagination_keep_content: true   # 保留分页内容
    # draft_if_future_date: true # 草稿发布日期大于当前日期则发布为草稿
    post_readtime: false   # 关闭阅读时间
    # post_readtime_words_per_minute: 300
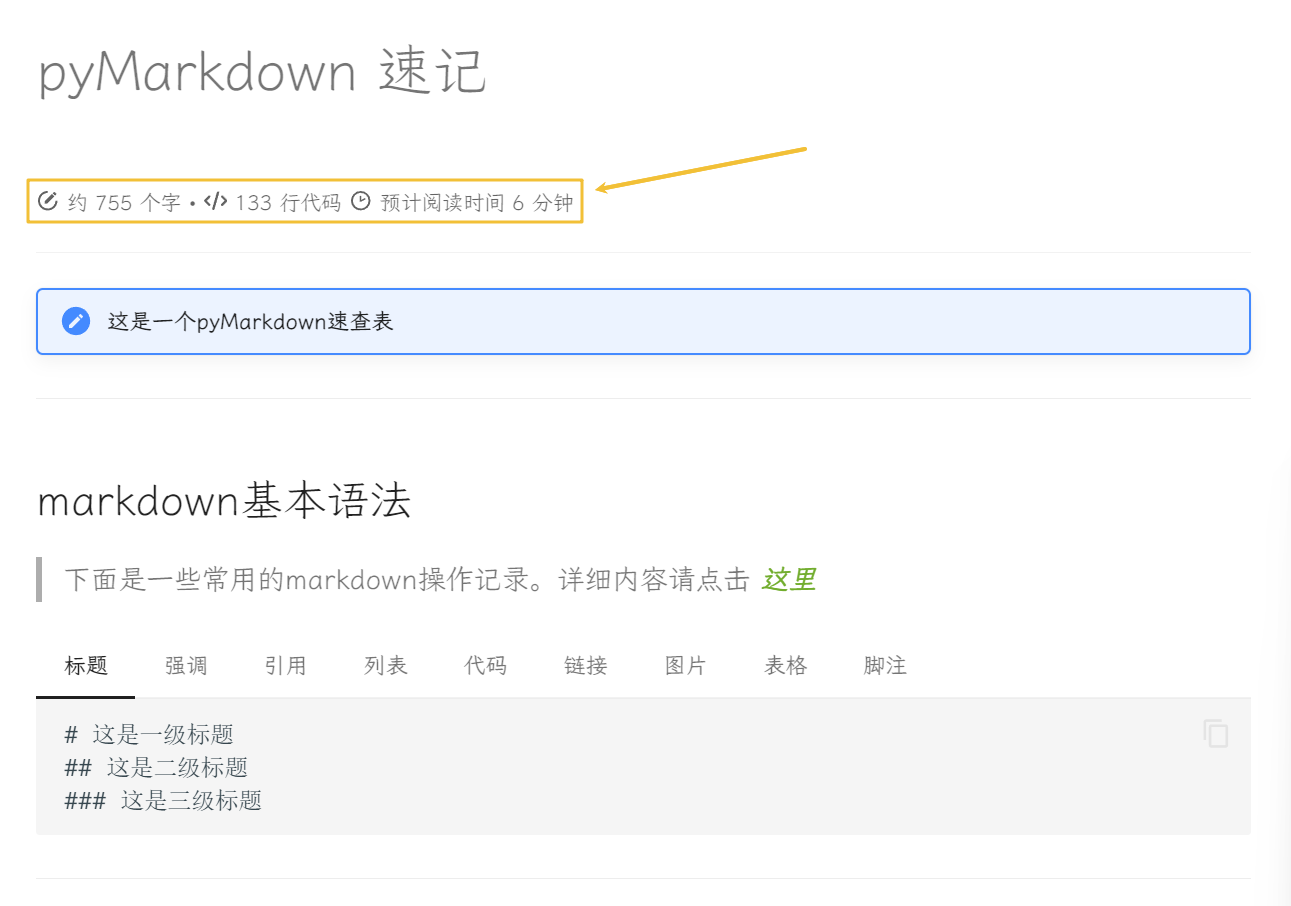
基于 statistics 插件的阅读时长计算
添加插件
具体字段见参考文档
为解决 Blog 下字体遮挡问题 ,需修改显示格式
在根目录下打开终端
<div markdown="1" style="margin-top: -30px; font-size: 0.75em; opacity: 0.7;">
:material-circle-edit-outline: 约 {{ words }} 个字 {% if code_lines != 0 %} • :fontawesome-solid-code: {{ code_lines }} 行代码 {% endif %}{% if read_time %}:material-clock-time-two-outline: {% if read_time == 0 %}预计阅读时间不到 1 分钟{% else %}预计阅读时间 {{ read_time }} 分钟{% endif %}{% endif %}
---
</div>
霞鹜文楷字体
extra_css:
  - https://cdn.jsdelivr.net/npm/lxgw-wenkai-webfont@1.1.0/style.css
  # - https://cdn.jsdelivr.net/npm/lxgw-wenkai-lite-webfont@1.1.0/style.css
  # - https://cdn.jsdelivr.net/npm/lxgw-wenkai-tc-webfont@1.0.0/style.css
  # - https://cdn.jsdelivr.net/npm/lxgw-wenkai-screen-webfont@1.1.0/style.css
_/* 自定义字体 */_
body {
      font-family: "LXGW WenKai", sans-serif;
      /* Lite version */
      /* font-family: "LXGW WenKai Lite", sans-serif; */
      /* TC version */
      /* font-family: "LXGW WenKai TC", sans-serif; */
      /* Screen version */
      /* font-family: "LXGW WenKai Screen", sans-serif; */
    }
_/* 按钮字体 */_
button.md-top {
    font-family: LXGW WenKai; _/* 修改字体 */_
    font-size: 16px; _/* 修改字体大小 */_
    font-weight: bold; _/* 修改字体粗细 */_
    color: #374148; _/* 修改字体颜色 */_
  }
两个地方上下对应,区别见参考文档
github 图床
思路
创建新仓库与 token -> 下载并配置 PicGo -> 上传图片 -> 替换 md 图片链接
个人感觉讲解意义不大,看这一篇即可
创建/修改时间显示
最终效果/参考:插件官方文档
安装插件
添加插件
plugins:
- git-revision-date-localized:  # 日期插件
    enabled: true
    fallback_to_build_date: true
    enable_creation_date: true  # 显示创建时间
    type: iso_datetime               # 日期显示格式(如 "2周前")
    # custom_format: "%Y-%m-%d"   # 自定义日期格式(如 "2023-10-01")
    locale: zh                  # 本地化语言(中文)
    timezone: Asia/Shanghai     # 时区
    exclude:                    # 排除某些文件
    - index.md
上述配置可按需修改,具体见官方文档👆
关于fallback_to_build_date字段
相当于default_date,但如果没有git信息,则显示build_date,否则则显示当前时间
因为我的本地环境没有git信息,必须设为true,否则无法渲染
修改GitHub Actions配置文件
jobs: # 工作流的具体内容
  deploy:
    runs-on: ubuntu-latest # 创建一个新的云端虚拟机 使用最新Ubuntu系统
    steps:
      - uses: actions/checkout@v2 # 先checkout到main分支
        with:
            fetch-depth: 0
      - uses: actions/setup-python@v2 # 再安装Python3和相关环境
        with:
          python-version: 3.x

        # 使用 GitHub Actions 部署,需在配置文件中添加插件安装步骤:不加则github编译报错
      - run: pip install mkdocs-material # 使用pip包管理工具安装mkdocs-material
      - run: pip install mkdocs-statistics-plugin
      - run: pip install mkdocs-rss-plugin # 附加rss插件
      - run: pip install mkdocs-print-site-plugin # 附加打印插件
      - run: pip install mkdocs-glightbox # 附加图片放大插件
      - run: pip install mkdocs-git-revision-date-localized-plugin

      # 编译网站,最后再run
      - run: mkdocs gh-deploy --force # 使用mkdocs-material部署gh-pages分支
推送到 GitHub 仓库,等待编译完成,即可在线浏览
关于git commit --amend引发的修改时间不更新问题及解决方案
git commit --amend默认不会更新AuthorDate,只更新CommitDate,但此插件默认查找前者
我们可以尝试在命令行中查找某一文件来验证:
> git log -1 --pretty=fuller -- docs/NBU-NOTEBOOK/DSP/index.md
commit f9fd57162f1125b31b4adefa48f799c666b69da9 (HEAD -> main, origin/main)
Author:     your_name <your_email>
AuthorDate: Mon Mar 31 16:56:41 2025 +0800
Commit:     your_name <your_email>
CommitDate: Fri Jul 11 18:44:12 2025 +0800
而其中的AuthorDate正是鄙人学会用--amend的时间,自此之后修改日期便不再动弹了🤣
解决方案:
灰常简单,添加时间即可:
一些简单的功能
鼠标模拟烟花 + 样式
js | css
var CURSOR;

Math.lerp = (a, b, n) => (1 - n) * a + n * b;

const getStyle = (el, attr) **=>** {
    try {
        return window.getComputedStyle
            ? window.getComputedStyle(el)[attr]
            : el.currentStyle[attr];
    } catch (e) {}
    return "";
};

class Cursor {
    constructor() {
        this.pos = {curr: null, prev: null};
        this.pt = [];
        this.create();
        this.init();
        this.render();
    }

    move(left, top) {
        this.cursor.style["left"] = `${left}px`;
        this.cursor.style["top"] = `${top}px`;
    }

    create() {
        if (!this.cursor) {
            this.cursor = document.createElement("div");
            this.cursor.id = "cursor";
            this.cursor.classList.add("hidden");
            document.body.append(this.cursor);
        }

        var el = document.getElementsByTagName('*');
        for (**let** i = 0; i < el.length; i++)
            if (getStyle(el[i], "cursor") == "pointer")
                this.pt.push(el[i].outerHTML);

        document.body.appendChild((this.scr = document.createElement("style")));
        // 这里改变鼠标指针的颜色 由svg生成
        this.scr.innerHTML = `* {cursor: url("data:image/svg+xml,<svg xmlns='http://www.w3.org/2000/svg' viewBox='0 0 8 8' width='8px' height='8px'><circle cx='4' cy='4' r='4' opacity='.5'/></svg>") 4 4, auto}`;
    }

    refresh() {
        this.scr.remove();
        this.cursor.classList.remove("hover");
        this.cursor.classList.remove("active");
        this.pos = {curr: null, prev: null};
        this.pt = [];

        this.create();
        this.init();
        this.render();
    }

    init() {
        document.onmouseover  = e => this.pt.includes(e.target.outerHTML) && this.cursor.classList.add("hover");
        document.onmouseout   = e => this.pt.includes(e.target.outerHTML) && this.cursor.classList.remove("hover");
        document.onmousemove  = e => {(this.pos.curr == null) && this.move(e.clientX - 8, e.clientY - 8); this.pos.curr = {x: e.clientX - 8, y: e.clientY - 8}; this.cursor.classList.remove("hidden");};
        document.onmouseenter = e => this.cursor.classList.remove("hidden");
        document.onmouseleave = e => this.cursor.classList.add("hidden");
        document.onmousedown  = e => this.cursor.classList.add("active");
        document.onmouseup    = e => this.cursor.classList.remove("active");
    }

    render() {
        if (this.pos.prev) {
            this.pos.prev.x = Math.lerp(this.pos.prev.x, this.pos.curr.x, 0.15);
            this.pos.prev.y = Math.lerp(this.pos.prev.y, this.pos.curr.y, 0.15);
            this.move(this.pos.prev.x, this.pos.prev.y);
        } else {
            this.pos.prev = this.pos.curr;
        }
        requestAnimationFrame(() => this.render());
    }
}

(() => {
    CURSOR = new Cursor();
    // 需要重新获取列表时,使用 CURSOR.refresh()
})();

// 生成随机颜色
function randomColor() {
    const colors = ['#FF1461', '#18FF92', '#5A87FF', '#FBF38C'];
    return colors[Math.floor(Math.random() * colors.length)];
}

// 生成烟花效果
function createFirework(x, y) {
    const fireworkContainer = document.createElement('div');
    fireworkContainer.classList.add('fireworks');
    fireworkContainer.style.left = `${x}px`;
    fireworkContainer.style.top = `${y}px`;
    document.body.appendChild(fireworkContainer);

    for (let i = 0; i < 25; i++) {
        const firework = document.createElement('div');
        firework.classList.add('firework');
        firework.style.backgroundColor = randomColor();
        firework.style.width = '5px';
        firework.style.height = '5px';
        firework.style.left = `${Math.random() * 80 - 50}px`;
        firework.style.top = `${Math.random() * 80 - 50}px`;
        firework.style.animation = `firework 1s ease-out forwards, fall 1s ${Math.random() * 0.5}s forwards`;
        fireworkContainer.appendChild(firework);
    }

    setTimeout(() => {
        fireworkContainer.remove();
    }, 300);
}
// 监听单击事件
document.addEventListener('click', (event) => {
    const x = event.clientX;
    const y = event.clientY + window.scrollY;
    createFirework(x, y);
});
_/* 鼠标样式 */_
#cursor {
    position: fixed;
    width: 16px;
    height: 16px;
    _/* 这里改变跟随的底色 */_
    background: rgb(209, 181, 116);
    border-radius: 10px;
    opacity: 0.4;
    z-index: 10086;
    pointer-events: none;
    transition: 0.15s ease-in-out;
    transition-property: background, opacity, transform;
}

#cursor.hidden {
    opacity: 0;
} */

#cursor.hover {
    opacity: 0.001;
    transform: scale(2.5);
    -webkit-transform: scale(2.5);
    -moz-transform: scale(2.5);
    -ms-transform: scale(2.5);
    -o-transform: scale(2.5);
}

#cursor.active {
    opacity: 0.01;
    transform: scale(0.5);
    -webkit-transform: scale(0.5);
    -moz-transform: scale(0.5);
    -ms-transform: scale(0.5);
    -o-transform: scale(0.5);
}
_/* 烟花容器 */_
.fireworks {
    position: absolute;
    pointer-events: none;
    z-index: 9999;
}

.firework {
    position: absolute;
    border-radius: 50%;
    opacity: 0;
    pointer-events: none;
    transform: scale(0);
    animation: firework 1s ease-out forwards;
}

@keyframes firework {
    0% {
        opacity: 1;
        transform: scale(1);
    }
    100% {
        opacity: 0;
        transform: scale(0);
    }
}

_/* 重力动画 */_
@keyframes fall {
    0% {
        transform: translateY(0);
        opacity: 1;
    }
    100% {
        transform: translateY(50px);
        opacity: 0;
    }
}
增添单击水波效果与滚动强调效果
js | css
// 新的点击效果:水波扩散(大小随机)
function createRipple(x, y) {
    const ripple = document.createElement('div');
    ripple.className = 'ripple';
    ripple.style.left = `${x}px`;
    ripple.style.top = `${y}px`;
    // 生成随机比例(2~5之间),保留两位小数
    const randomScale = (Math.random() * 3 + 2).toFixed(2);
    ripple.style.setProperty('--random-scale', randomScale);
    document.body.appendChild(ripple);

    // 动画完成后移除该元素(800ms 与 CSS 动画时间对应)
    setTimeout(() => {
        ripple.remove();
    }, 800);
}

document.addEventListener('click', (event) => {
    const x = event.clientX;
    const y = event.clientY + window.scrollY;
    createRipple(x, y);
});

// 监听滚动事件,为鼠标添加更精致的滚动交互效果
document.addEventListener('scroll', () => {
    // 添加 scrolling 类,触发滚动时的样式效果
    CURSOR.cursor.classList.add('scrolling');
    // 清除之前可能存在的定时器,避免连续滚动导致提前移除
    clearTimeout(CURSOR.scrollTimeout);
    // 设置定时器,150毫秒后移除 scrolling 类
    CURSOR.scrollTimeout = setTimeout(() => {
        CURSOR.cursor.classList.remove('scrolling');
    }, 150);
});
/* 新的点击水波效果 */
.ripple {
    position: absolute;
    width: 20px;
    height: 20px;
    border: 1.5px solid #ede1c7; /* 可调整边框颜色 */
    border-radius: 50%;
    transform: translate(-50%, -50%);
    pointer-events: none;
    z-index: 9999;
    animation: ripple-effect 0.8s ease-out forwards;
}

@keyframes ripple-effect {
    0% {
        transform: translate(-50%, -50%) scale(1);
        opacity: 1;
    }
    100% {
        transform: translate(-50%, -50%) scale(var(--random-scale, 4));
        opacity: 0;
    }
}

/* 鼠标滚动时的精致交互样式 */
#cursor.scrolling {
    transform: scale(1.3) rotate(5deg);  /* 稍微放大并轻微旋转 */
    opacity: 0.85;                       /* 提升透明度,使效果更明显 */
    box-shadow: 0 0 8px rgba(0, 0, 0, 0.2);/* 添加柔和阴影,增强层次感 */
    transition: transform 0.15s cubic-bezier(0.25, 0.46, 0.45, 0.94),
                opacity 0.15s cubic-bezier(0.25, 0.46, 0.45, 0.94),
                box-shadow 0.15s cubic-bezier(0.25, 0.46, 0.45, 0.94);
}
图片放大
bug
目前发现鼠标单击导航栏/目录后,图片放大失效,原因未知
建议先用插件
js | css
// 监听图片放大事件
document.querySelectorAll('.zoom').forEach(item => {
    item.addEventListener('click', function () {
        this.classList.toggle('image-zoom-large');
    })
});
/* 图片放大start */
.shadow {
box-shadow: 0 4px 8px 0 rgba(0, 0, 0, 0.2), 0 6px 20px 0 rgba(0, 0, 0, 0.19);
}

.zoom {
transition: transform ease-in-out 0.5s;
cursor: zoom-in;
}

.image-zoom-large {
transform: scale(1.5);
cursor: zoom-out;
box-shadow: 0 4px 8px 0 rgba(0, 0, 0, 0.2), 0 6px 20px 0 rgba(0, 0, 0, 0.19);
z-index: 100;
position: relative;
}
/* 图片放大end*/
上方进度条

js | css
    // 监听滚动条事件
    document.addEventListener('scroll', function () {
        const docHeight = document.documentElement.scrollHeight - document.documentElement.clientHeight;
        const scrolled = (window.scrollY / docHeight) * 100;
        const progressBar = document.getElementById('progress-bar');
        progressBar.style.width = `${scrolled}%`;
    });
个性化地址栏
在当前页面失去焦点时卖萌(´・д・`)
js
// 监听页面可见性变化事件
document.addEventListener("DOMContentLoaded", function () {
    let originalTitle = document.title; // 存储原始标题
    const awayTitle = "跑哪去惹(*´・д・`)"; // 当用户离开页面时显示的标题
    // 监听页面是否可见
    document.addEventListener("visibilitychange", function () {
        if (document.hidden) {
            document.title = awayTitle; // 当页面失去焦点时更改标题
        } else {
            // 当用户回到页面时恢复标题并开始秒更新一次
            document.title = originalTitle; // 恢复标题
        }
    });
    setInterval(function () {
        if (!document.hidden){
            originalTitle = document.title;
        }
    }, 1000);
});
页面恢复
再次访问HOME页面时自动重定向上一次的最后退出位置
js
// 页面访问记录
document.addEventListener("DOMContentLoaded", function () {
    // 获取当前页面的完整 URL
    const currentUrl = document.location.href;
    const currentPath = document.location.pathname;
    // console.log("Current URL:", currentUrl, currentPath);

    // 获取最后访问的页面 URL
    const lastVisitedUrl = localStorage.getItem("lastVisitedUrl");

    // 检查是否在主页
    const isHomePage = currentPath === '/';

    // 如果在主页、最后访问的 URL 存在且不等于当前 URL(规避死循环),跳转到最后访问的页面
    if (isHomePage && lastVisitedUrl && lastVisitedUrl !== currentUrl) {
        document.location.href = lastVisitedUrl;
    }

    // 每隔1秒检查当前 URL 并更新 lastVisitedUrl
    setInterval(function () {
        // 获取当前页面的完整 URL
        const currentUrl = document.location.href;

        // 获取最后访问的页面 URL
        const lastVisitedUrl = localStorage.getItem("lastVisitedUrl");

        // 如果当前 URL 与最后访问的 URL 不同,则更新 lastVisitedUrl
        if (currentUrl !== lastVisitedUrl) {
            localStorage.setItem("lastVisitedUrl", currentUrl);
        }
    }, 1000);
});
至此,理论上博客就已竣工,剩下的就是无穷的软装了
